Uniprint Technote: Configuring Guest Cards
Overview
The Guest Card feature is not supported on Pharos Stations and some old Network Terminals. Guest Card is only supported on Pharos Omega PS150 version 2.2.2 or later. For a list of supported Network Terminals, please contact Pharos Support.
The Guest Card feature allows non-authenticated users (e.g. guest users, visitors) to use printing and copying resources, without needing actual user accounts in the Pharos systems or in an external directory system. Guest users can purchase "Guest Cards" from a librarian or a university staff member. The Guest Card may be pre-loaded with a specific amount allowing users to immediately print or make copies.
Guest Cards can be implemented with the Card Registration feature, which allows authenticated users to self-register from Network Terminals.
Typical User Scenario
The following illustrates the typical scenario for using Guest Cards. In this scenario, a guest user wants to print a document but does not have an existing account in the Pharos database or in the external directory system.
- A guest purchases a visitor card.
- The guest logs on to an available lab computer using the defined guest network user credentials.
- The guest prints a document to a Uniprint queue.
- The Popup Client on the lab computer detects that a guest is logged on and prompts the guest to enter the ID printed on their visitor card.
- The guest enters the required ID.
- Once they have finished using the lab machine, the guest walks up to a printer with a Pharos network terminal.
- The guest swipes the visitor card.
- The server detects that it is a visitor card and automatically logs the user on without requiring additional registration information (since the guest does not have a network account).
- The guest can select the previously submitted document and print it.
After the jobs are released or cancelled, a new user will be created in the Pharos system with the card ID (usually printed at the front of the card) as the new Logon ID. If another account with the same card ID is already in the Pharos system, the card ID will be removed from that account and will be assigned to the new account instead.
Setting up Guest Cards
Setting up Guest Cards requires multiple components to be configured. The steps below give you an overview of what is required to set up a Guest Card system in Pharos Uniprint.
Guest Cards are set up in the System > Banks context of Pharos Administrator.
Before you Start
Before setting up Guest Cards, you must have already set up a printing system. You should have already configured Queues, Secure Release Print Groups, Devices, and Network Terminals in Pharos Administrator.
Step 1: Add a Guest Card Type to the relevant Bank
You can add one or more Guest card types in the System > Banks context of the Pharos Administrator. The Banks context provides you with the Guest Card Type wizard, which allows you to define supported Guest Card types using regular expressions.
To add a Guest Card Type:
-
In the System > Banks context, select the Bank that you want to configure with Guest Cards or alternatively insert a new Bank.
-
In the Network Terminal category of the Bank, set "Allow logon using card " to "Yes". This makes the Guest Account Card Types property available.
-
In the Guest Account Card Types property, click the edit button. This opens the Guest Account Card wizard as shown in Figure1.
-
In the Sample Card ID field, enter a sample Guest Card ID.
-
In the Layout field, enter the pattern that will be used to extract the required user ID from the Sample Card ID. Make sure that the number of characters in the Sample Card ID matches the number of characters in the pattern on the Layout field.
-
In the Regular Expression field, enter the pattern that will be used to match the card format. Use the Sample Card ID to derive the regular expression.
-
Click OK to add this guest card type to the Bank.
For a detailed explanation on how to configure Guest Card types using the wizard, please refer to the Configuring Guest Card Types section below.
Guest Account Card Type Wizard
You can add as many guest card types as you require. To add an additional guest card type, click the "Add Additional Card" button found at the upper right corner of the Guest Card Wizard.
If you have already defined guest card types, and you set the Allow logon using card id and password to "No", the card definition settings will be lost. However, you will be given the option to either confirm or cancel the operation.
Step 2: Configure a Popup Question Group with a "Guest Account" question
When configuring Guest Cards, you must configure a Popup Question Group with a "Guest Account" question. A Guest Account Question is a special question type that requires Guest users to enter a Guest Card ID in the Popup client.
By default, a Question Group called “Username Password Questions” is installed with Pharos Administrator.
To add a Question Group:
-
Select Output Management > Popup Questions from the Context Tree.
-
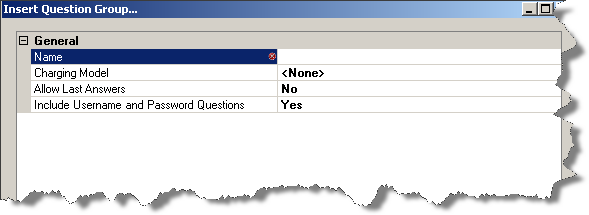
Click the Insert Question Group action on the Popup Questions context Actions pane. This opens the Insert Question Group dialog box.
-
In the Name field, enter a name for the new group.
-
In the Charging Model field:
-
If you want to create a Charging Model group, select the charging model that group’s questions will be taken from.
-
If you want to create a Standard Question Group, keep the default “None”.
-
-
In the Allow Last Answers field:
-
Select “Yes” to display a "Last Answers" button, which users click on to skip all questions and automatically send the same answers they provided the last time they answered the questions.
-
Selecting “No” disallows last answers for a group.
-
-
In the Include Username and Password Questions, select whether to include Username and Password Questions to the Question Group.
-
Click OK and Change Control.
-
If you selected to Include Username and Password Questions, your new Question Group already has the Username and Password Questions added to your new group.
-
If you selected to create a Charging Model Group, you can see that one question is added for each Cost Center Category.
-
For more information about Question Groups properties, refer to the “Changing Question Group Properties “in the Pharos Online Help.
To add a Guest Account Question:
-
In Output Management > Popup Questions, select the Question Group that you want to add the Guest Account Question to.
-
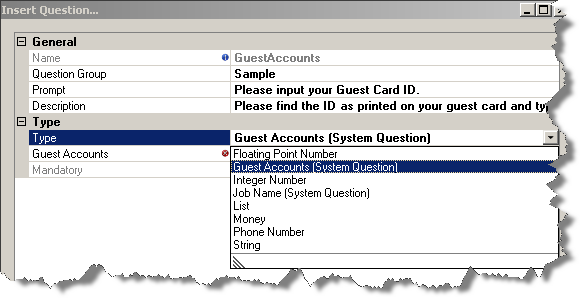
From the Popup Questions Action pane, select the Insert Question button. This opens the Insert Question dialog box.
-
In the Type property, select Guest Accounts (System Question). This automatically sets the Name of your Question to Guest Accounts.
-
Change the Prompt and Description properties if required.
-
In the Guest Accounts property, enter list of domain user accounts that are used by guests. Enter user accounts in the format domain_name\username.
-
Click OK.
For a list of the accepted guest account user name formats, please refer to the Domain Account formats for Guest Accounts.
Step 3: Associating the Question Group to a Queue
After adding the Question Group with a Guest Account Question, you have to associate this Question Group to a Queue. The Queue should be associated to a “Secure Release” Print Group.
A Guest Account Question is not supported on Direct Printing. The "Guest Accounts" Question Type is not available for selection if the Question Group in which you are trying to insert the new question is associated with a Queue whose Print Type is “Direct Printing” (Print Type of a Queue is based on the associated Print Group).
-
Go to the Output Management > Queues context of Pharos Administrator.
-
Select the Queue that you want to associate with the Question Group.
-
In the Packages property, select the Question Group that you have created.
-
Click Change Control to save changes.
Step 4: Associate the Network Terminal with the Bank
The next step is to associate a Network Terminal with the Bank configured with the Guest Card Type (the Bank configured in Step 1).
To associate the Network Terminal with the Bank:
-
In the Release Stations context, select the Network Terminal for which you want to associate the Bank.
-
In the Bank property, select the Bank that you have configured in Step 1.
Step 5: Configuring Network Terminals to set the stripping of sentinels to "No"
By default, some Network Terminals, e.g. iMFPs and Omegas are configured to strip the sentinels (characters that denote the beginning and end of the card swipe data) from the Sample Card ID.
The Pharos Administrator via the Guest Card type wizard already handles stripping of the sentinels; hence, you must turn off stripping of the sentinels from the Network Terminals. If the sentinels are stripped from the Network Terminals, Uniprint will not recognize the swiped card as a Guest Card but the card will be treated as a Logon ID, which will be invalid.
To configure the Network Terminals to turn off stripping of sentinels:
-
In the Release Stations context, select the Network Terminal.
-
Set the "Strip the Sentinels from Individual Tracks" property to "No". Depending on your Network Terminal, you can find the Strip Sentinels from Individual Tracks property in different categories. For example, for HP and Omega, stripping of the sentinels can be configured from the Card Reader category while for Ricoh this property is available under USB Device category.
-
Click Change Control to apply the change.
Configuring Guest Card Type
The following table explains each of the fields on the Guest Card type wizard.
|
Field |
Description |
|---|---|
|
Sample Card ID |
Sample Card ID is the full card ID (raw card ID) from a card reader. To set up Sample Card ID, connect a USB card reader to your computer. Open a Text Editor, e.g. Notepad and scan or swipe your Sample Card. Copy the generated card ID to the Sample Card ID field. |
|
Layout |
A Sample Card ID may contain a long sequence of characters, for example 16 digits and a series of special characters. Layout defines the pattern used to extract the required user ID from the Sample Card ID. The following symbols are used to define the Guest Card type layout:
Examples:
|
|
Regular Expression |
Regular expression is the pattern used to match a card ID against a Guest Card type. For example, you have a card format that looks like this ;1234567899991082? You can declare the regular expression as: ^;[0-9]{16}\?$ The regular expression will match any card ID that follows this pattern - a card ID that begins with a semicolon, followed by 16 digits, and ends with a question mark. For more information, please refer to the "Regular Expressions format" section. You can also read regular expression tutorials on the Internet. |
|
Resulting Card ID |
The result after stripping unused characters from the Sample Card ID. |
Example:
The following gives you an example of how to configure a Guest Card type given a card format. Let's say you have a Guest Card that when scanned reads:
;8964028454563816=2307?
Sample Card ID
In the Sample Card ID field, enter the full card ID ;8964028454563816=2307?
Layout
Layout extracts the required User ID from the Sample Card ID. Let us assume that the required user ID is the underlined digits (5456381). Usually, the required User ID corresponds to the card number printed at the front of the card.
;8964028454563816=2307?
In this example, the underlined digits will be defined as the required User ID (denoted by letter "i") and the rest of the characters will be defined as unused (denoted by letter "u"). The layout will be:
uuuuuuuuuiiiiiiiuuuuuuu
The number of characters in the Sample Card ID and the Layout fields should match. You will also notice that the Resulting Card ID shows the significant characters from the Layout field.
Regular Expression
Using the Sample Card ID format ;8964028454563816=2307?, you can define the regular expression as:
^;[0-9]{16}\=[0-9]{4}\?$
The following table describes the regular expression:
|
Regular Expression |
Description |
|---|---|
|
^; |
The caret symbol ^ means to start the match at the beginning of the string. In the example, the Sample Card ID string starts with a semicolon. The ^; expression means start the match from the semicolon. |
|
[0-9]{16} |
The Sample Card ID contains 16 digits. The expression [0-9]{16} means 16 digits between 0 and 9. |
|
\= |
The 16 digits are followed by the equal sign. In regular expressions, the backslash \ denotes escape sequence, which is used for characters with special meaning. The equal sign has a special meaning in regular expression, thus \= matches the character =. |
|
[0-9]{4} |
The [0-9]{4} expression means 4 digits between 0 and 9 |
|
\?$ |
The dollar symbol $ means to look at the end of the string. The Sample Card ID ends with a question mark. Like the equal sign, the question mark has a special meaning in regular expressions; therefore this needs to be escaped using the backslash, hence the expression \?$. |
Domain Account Formats for Guest Accounts
The following lists the possible formats of the domain accounts for "Guest Accounts" Question.
- guest1 guest2 guest 3
- vmdomain.local\guest1
- CN=guest 1, CN=Users, DC=vmdomain, DC=local ('guest 1' is a Full Name)
- vmdomain\guest1
- vmdomain.local/Users/guest 1('guest 1' is a Full Name)
- guest1@vmdomain.local
- vmdomain\Guest1