Uniprint Technote: Load Balancing Uniprint using HAProxy
Pharos has tested Uniprint 9.1 SP1 or greater using the High Availability Proxy (HAProxy), which is an open source HTTP/TCP load balancer that runs on most Linux distributions and other operating systems like Solaris or FreeBSD.
This document provides instructions on how to configure HAProxy for Uniprint as well as the changes required to the Uniprint components for load balancing to work. The document describes how to set up a single well-connected site. Multi-site systems (i.e., connected via a WAN) is beyond the scope of this document, but it can be configured if required.
Load balancing is not intended as a disaster recovery solution. As part of its function, the load balancer performs a health check (normally as a heartbeat to a named TCP or UDP port listening on the server), but only to ensure that it directs inbound traffic to an available device. Print jobs that are already stored on a “down” server are lost, potentially with no option to retrieve. That one important gap disqualifies it as a disaster recovery solution. If anything, load balancing simply extends availability, much like server clustering does.
The most common redundancy strategies are RAID, backups, and clustering. For more information, please refer to the Uniprint Maintenance Guide document in the Pharos Community.
Overview
Pharos Uniprint provides a robust, customizable, and highly scalable solution. It can handle large print volumes and transaction loads and can support an unlimited number of users and printers. However, in larger customer sites where Print Servers are under heavy load, you may notice a degradation in performance. Implementing a load balancing solution could be useful to enhance the performance, reliability, and scalability of your Uniprint system.
Adding a load balancer to your Uniprint environment provides the following advantages:
-
Enhances performance and reliability. Load balancing distributes the workload and traffic across several servers. In case of a server failure, the load balancer automatically routes requests (print jobs, list jobs, etc.) to other servers. For example, if one Pharos API fails, the Print Center continues to work because requests are redirected to other active API servers. Routing of requests does not require manual intervention from site administrators.
-
Allows for easy scaling of Print Servers. Adding more devices requires simply adding servers. It does not require any movement or configuration change to existing clients or terminals to re-balance the load. This can be extended to multiple load balancers, creating segmented load balanced subnets separated by WANs, if required.
-
Simplifies deployment of packages. All clients point to the load balancer, so:
- All clients are configured the same
- No changes to clients when servers are retired/changed
-
Simplifies Release Station configurations
- All users have a single common IP address to deliver print jobs, no matter where they are.
- All terminals have a single common IP address to connect to.
- Reduction in fleet maintenance activity if you change or remove print server.
Here’s how a simple Uniprint system would look with a load balancer:
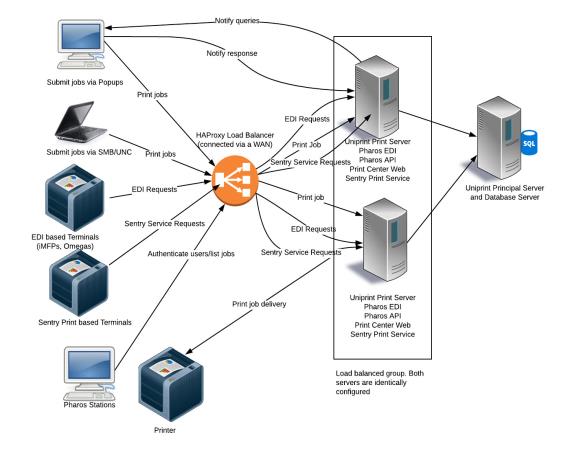
Figure 1 Load balanced Uniprint Servers
In the figure above, two replicated Uniprint Print Servers are installed behind the load balancer. The Uniprint Print servers are configured identically, meaning the same set of services are installed (e.g. LPD, SRS, Popup), the same set of queues with matching print drivers are configured, and the same costing, billing and scripts are defined.
A single HAProxy load balancer receives all print jobs from workstations and delivers them to random print servers. When a user submits a job, the job is sent to the load balancer. The load balancer then routes the jobs to the most suitable print server ensuring that the load is balanced evenly across all available servers. Any Notify functionality is still a direct connection between the print server that the job is sent to and the workstation from where the job was submitted.
Incoming requests are distributed to servers depending on the load balancing algorithm defined for each component in the haproxy.cfg file (described below). In the configuration example in this document, some traffic is distributed randomly (each request to a different server) and some traffic requires affinity (i.e. a PC generally talks to the same server).
Pharos Terminals (i.e., Omegas, iMFPs) and Pharos Stations all point to the same load balancer, which distributes requests across the print servers. Similarly, Print Center requests are also directed to the load balancer.
If using MobilePrint, we recommend installing the MobilePrint Worker Service on each Uniprint Print Server behind the load balancer as shown in the figure below. It is also recommended to install the MobilePrint Workflow on a separate server (i.e. a server which is not part of the load balancing configuration).
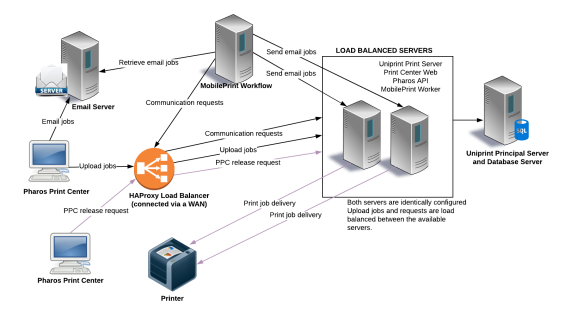
Figure 2 Load balanced Uniprint Servers with Pharos MobilePrint
Uniprint components that cannot be load balanced
The following Uniprint components cannot be load balanced.
- Principal Services (e.g. Database, License Services)
- Pharos Database
- SignUp Services
- MobilePrint Workflow
- Uniprint Website
- Pharos Payment Notification Service
Load Balancing Uniprint using HAProxy
This section details the steps required to configure load balancing for Uniprint. You are not required to follow the steps in the order listed here but it is recommended to follow the first four steps in order.
Prerequisites
-
This configuration requires Uniprint 9.1 or later.
-
A Linux machine installed with HAProxy. We assume familiarity with HAProxy and the terms associated with load balancing technology. For information on HAProxy, refer to the HAProxy website http://www.haproxy.org/.
The configuration information in this document assumes you are setting up a load balanced system as follows:
- A Pharos Database server
- A server hosting the HAProxy load balancer. For the sake of this document, we will call the load balancer haproxy.university.edu.
- 2 Uniprint Print Servers RM-2016, RM-2k12R2B, with identically configured components:
- Popup Service/Notifier service
- LPD Service
- Print Center API and Web Services
- EDI Service
Step 1: Update HAProxy Configuration file
The configuration information in this document covers relaying SSL traffic. For more information on SSL, refer to the HAProxy website.
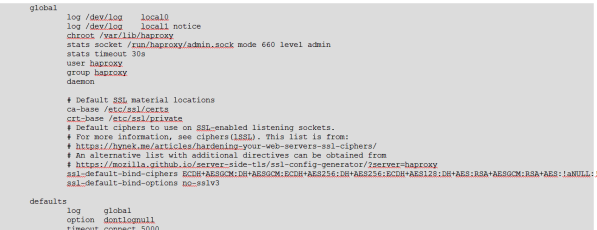
HAProxy is configured via the file /etc/haproxy/haproxy.cfg. This file is created during the installation of HAProxy. The example config file below is configured to load balance all Uniprint services, including SMB/UNC printing.
1. Using a text editor (e.g. nano or vim), open the file haproxy.cfg from /etc/haproxy/.
The following command line opens the haproxy.cfg file using the nano text editor.
$ sudo nano /etc/haproxy/haproxy.cfg
2. Copy the content of the sample-haproxy-config.txt file to the haproxy.cfg. You can find this file in the Load Balance package attached to this document. You can find the attached file at the very bottom of this document (under Files).
3. Update the configuration file as you see fit for your organization.
Notes:
- Replace the names haproxy.university.edu, RM-2016, RM-2k12R2D with the load balancer and Uniprint print servers of your print environment.
- You must be able to ping every hostname (of your Uniprint Print Servers) from the load balancer.
4. Restart the HAProxy for the configuration changes to take effect.
$ sudo service haproxy restart
Step 2: Add the load balancer as a fake server in the Pharos Database
When configuring Uniprint with a load balancer, you will need to add the load balancer as a server in the Pharos Database because various components check the entries in the Database when deciding what to connect to. This also enables Release Stations to be associated with the load balancer and enables the Server Configuration context in Pharos Administrator to show whether connections to services on the load balancer are working.
The AddServerForUniprintLoadBalancing.SQL script, which is supplied in the Load balancer package (found at the bottom of this document) adds the load balancer as a fake server in the Uniprint Database. The script contains instructions on what parameters to edit. These lines are marked by the words "MODIFY THIS LINE" or "REMOVE THIS LINE" in a comment. Edit the script as you see fit and then run it against the Pharos Database using the SQL Server Management Studio.
After editing and running the script, navigate to the System > Server Configuration context of Pharos Administrator. Check if a new server (with the load balancer’s hostname) is added to the list of servers, with all the services running.
The following image shows the haproxy.university.edu server in the Server Configuration screen.
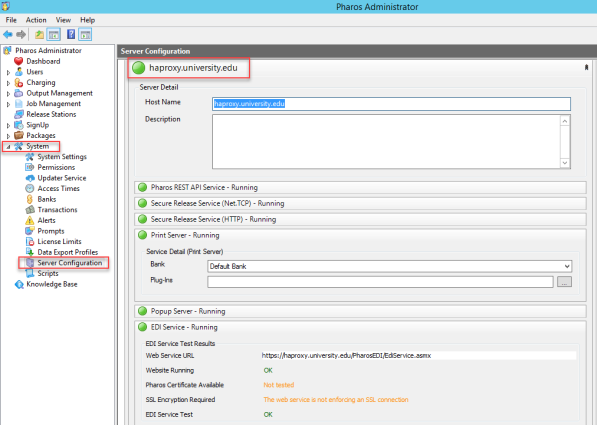
Although it may appear that Pharos services are running on the load balancer (i.e. the fake print server), it does not actually run any Uniprint components, it is simply handing TCP traffic onto one of the actual Uniprint print servers
Figure 3 Server Configuration context showing the load balancer (fake print server)
Step 2.1: (Applies to Uniprint 9.2 installs only) Update the general settings configuration file for any load balanced Print Server
For each load balanced Print Server instance, update the generalsetttings.config file to point the baseFqdn to haproxy. This ensures that the printer requests should be balanced correctly.
- Using a text editor, open the generalsettings.config gile under C:\Program Files(x86)\Pharos\SiteService\App_Data.
- Update the baseFqdn value to the haproxy server name (e.g. haproxy.university.edu).
Step 3: Ensure all Print Servers behind the load balancer have a consistent configuration
All print servers behind the load balancer must be identically configured. For example, if an EDI Service is installed on one Print Server, it must also be installed on all the other Print Servers. Having identically configured print servers is crucial with load balancing because any request may hit any server and must be treated identically by all servers.
Make sure that the following components and configurations are identical across all the Uniprint Print Servers behind the load balancer:
-
Installed Services– Our general recommendation is to install EDI Services, Print Center Web, and Pharos API on all the Uniprint print servers.
-
Queues – Make sure that each Uniprint print server has the same set of queues and drivers, with identical properties.
-
Server Configuration – Ensure that print servers have identical Banks attached to them.
-
Scripting/events/plugins
-
Costing/billing
Step 4: Configure the List Jobs Timeout Milliseconds registry key
If one of the servers behind the load balancer is offline for whatever reason, listing jobs at a Release Station may cause delays because the Secure Release Service waits for the network timeout before considering the attempt failed. The delay in completing connection attempt is around 20 seconds.
You can minimize the delay by adding the List Jobs Timeout Milliseconds registry entry under the Print Server as shown below. This key defines the length of time (in milliseconds) that a server waits for a response from another server when listing print jobs at a Release Station or Print Center. After this time, the server will stop waiting for a response from the other server and get on with the rest of its processing.
-
Key: HKEY_LOCAL_MACHINE\SOFTWARE\Wow6432Node\Pharos\Print Server
-
Value : List Jobs Timeout Milliseconds
-
Type : REG_DWORD
You must create this registry key manually. You’ll need to restart the Secure Release Service for the change to take effect.
Step 5: Load Balancing Pharos Popups
Popups are usually installed and configured using packages. Packages are based on the print drivers available on Pharos print servers. However, the load balancer is not a real print server, so you cannot build a package on it. A custom module can be added to a client package to change a popup queue created on a client so that jobs are sent to the Load Balancer instead of the server the package was created.
The instructions in adding a custom module and creating a package are detailed below.
Before creating a custom module
-
Make sure that every print server behind the load balancer has the same set of queues. For example, if one print server has Queue1 and Queue2, all the other print servers behind the load balancer must also have these queues and are configured with the same print driver, they belong to the same Print Group, and are associated with the same Job Cost Method.

Figure 4 Example showing two sets of replicated queues on two print servers
2. For one of the replicated queues, configure the Workstation Display Name property and provide a name that makes sense to a user. The Workstation Display Name is the name that is used when the package/queue is installed on the workstation. For example, Queue1 can be shown to users as Black&WhiteQueue instead of Queue1 on PBV-2012.
You can’t have a duplicate Workstation Display Name on two different servers.
Select and filter on one server and then configure the Workstation Display Name for each of the replicated queues. Ensure you select this server when building your packages in the following steps.
Adding a Custom Module
The load balancer package (found at the bottom of this document under Files) includes the script called RenameServer.bat.This file renames the print server used by the Popup client in Uniprint. The script finds all the queues installed with the popup client and then replaces the PrintServer registry setting under HKEY_LOCAL_MACHINE\SOFTWARE\Wow6432Node\PharosPopup Client\LocalPrints\{Queue name} with that of the load balancer (instead of the controlling print server).
The RenameServer.bat file can be used as a Custom Module that is included in the package, so that it runs automatically when the Popup client and its printers are installed. To enable this, you must define a MIME type of text/plain for the .bat extension; in IIS Manager. This may be done at the level of the Uniprint folder if applying it to Default Web Site is considered undesirable. Restart the World Wide Web Publishing Service or wait for the worker process to recycle for the changes to take effect.
To add a custom module:
-
Using a text editor, open the RenameServer.bat script and then change the print_server and load_balancer fields to the print server that you will create packages on, and the load balancer name.
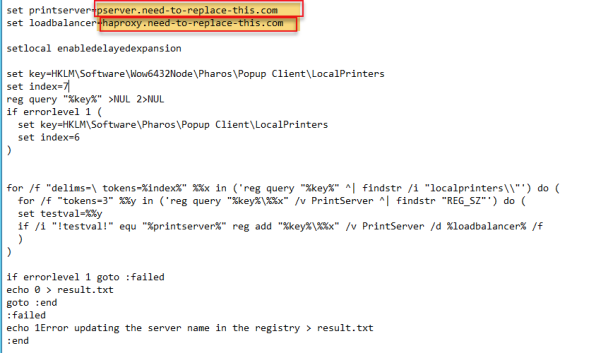
Figure 5 Contents of the RenameServer.bat file
-
In the Packages > Custom Modules context in Pharos Administrator, create a new custom module. Set the 64-bit Module Filename to the path of the RenameServer.bat file.
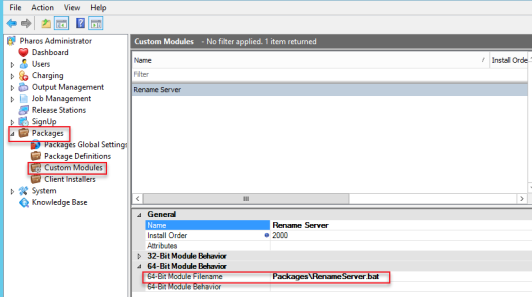
Figure 6 Custom Modules context in Pharos Administrator
Creating the Package
After creating the module, you can now create a new package or update your existing package.
-
In the Packages > Package Definitions context, create the package (or update an existing package) including at least the following modules:
- Pharos Popup Client
- Custom module created above.
-
In the Custom Modules property, set the custom module to the one you’ve created in the previous step.
-
In the Queues property, select one or more queues from the Print Server behind the load balancer whose queues you configured the Workstation Display Name field previously.
You will only need to create a package for one of the servers when building packages. So, when selecting queues for the package, you only need to pick one replicated queue for one server. In our example, the print job will be delivered via LPR to one of the servers behind the Load Balancer, all of which have a “SecureQ2”, and so will receive and spool the job.
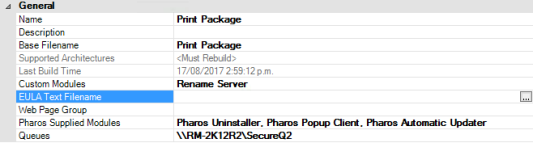
Figure 7 Example showing the selected Queue
-
Build the package and distribute to your clients. When the package is installed, the script will run and modify the registry so that popups and job delivery all go through the load balancer.
Notify
Once a Print Server receives the job, if the server has any plug-ins configured which use Notify functionality to provide information to the client or ask further questions of the user (eg cost acceptance dialogs), the server will make a direct connection to the workstation (based on the workstation information included in the Popup information). Any answers from the client for these Notify messages will be sent back from the client to the server on that direct connection.
Step 6: Load Balancing Pharos Print Center
The Pharos Print Center (PPC) is a web application which can live behind a Load Balancer. As a web server, its traffic will generally arrive on port 443 and will be routed to the Pharos API.
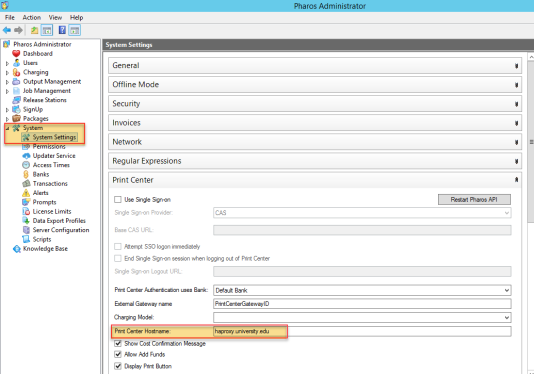
You will need to update the Print Center hostname (the machine hosting the Pharos Print Center Web component) to be the load balancer. Users connect to the Print Center using this hostname, e.g. haproxy.university.edu/myprintcenter. The load balancer forwards requests to one of the Print Center Web instances on the load balanced machines, which in turn talks to the Pharos API for requests and then the Pharos API talks to the Print Servers (typically local). This is done in the System > System Settings context of Pharos Administrator.
 \
\
Figure 8 Print Center Hostname setting in Pharos Administrator
Step 7: Load Balancing Release Stations
Release Stations must point to the load balancer, to distribute requests across the print servers. The following section details how to update Terminals and Pharos Stations with load balancing.
Terminals
Each Terminal (e.g. Omegas, iMFPs, and other EDI clients) will need to be connected to the load balancer. You do this by configuring the terminals with the server in the URL set to the load balancer.
-
Using the terminal configuration screen or the terminal’s configuration web page, update the terminal’s PEDI settings to connect to the following URL:
https://<server>/PharosEdi/EdiService.asmx
where <server> is the hostname fake print server set up in Step 2, e.g. https://haproxy.university.edu/PharosEdi/EdiService.asmx
-
In the Release Stations context of Pharos Administrator, set the Print Server property to the fake print server (which is the load balancer). In our example, Print Server will be set to haproxy.university.edu
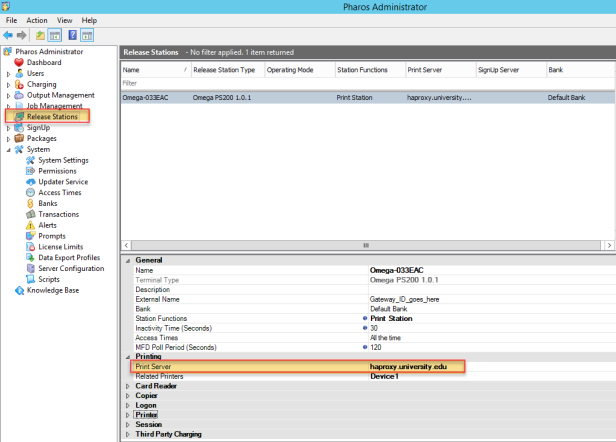
Figure 9 Release Stations context in Pharos Administrator
The load balancer is set to use source balancing so that once a terminal is connected to a Print Server, it will generally reconnect to that one. If the server dies, the terminal will attempt a reconnect and the load balancer will attach it to another print server.
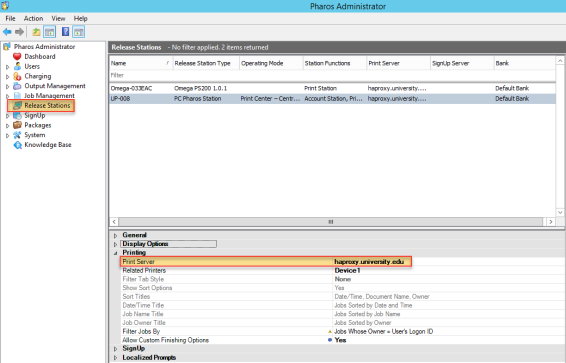
Pharos Stations
While Terminals access the Pharos system via the Pharos External Device Interface (EDI), Pharos Stations get their connection information directly from the Pharos Database server and only connect to the print server that is set as their controlling print server. In a load balancing solution, all Pharos Stations must be associated to the load balancer. The load balancer then connects them to one of the other print servers (using source affinity). To set up Pharos Stations for load balancing, in the Release Stations context, ensure that you Pharos Stations Print Server property points to the fake print server (that is the load balancer).
Step 8: Load Balancing Pharos MobilePrint
With MobilePrint installed, the communication between Print Center Web and Pharos API goes through the load balancer.
To set up MobilePrint with load balancing, you will need to change the Print Center Web Server on all your MobilePrint servers (all MobilePrint Workers and MobilePrint Workflow) to identify the load balancer as the Print Center to connect to. This is accomplished using the MobilePrint Configurator tool.
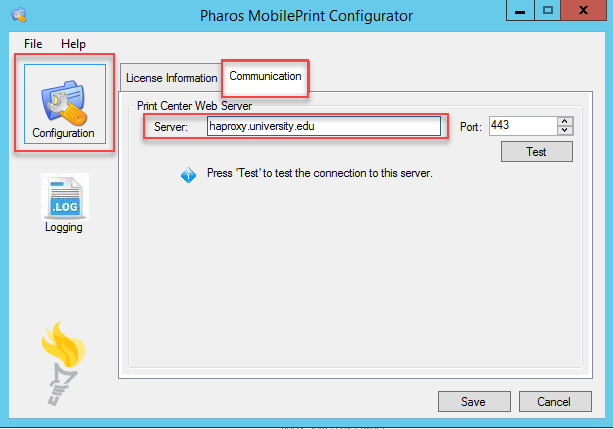
Figure 10 Pharos MobilePrint Configurator
Step 9: Load Balancing SMB/UNC Printing
With SMB/UNC printing (i.e. not LPR or Popups), the user connects to the printer \\<proxyname>\<queuename> as usual. When Windows attempts to connect to the Load Balancer, it is routed to one of the print servers behind the scenes. The server responds with its own (i.e. actual) servername/IP address, and the client then talks directly to the server, bypassing the LB. This will generally be fine, as those connections are distributed across the print servers using affinity/source routing.
When the print server used for SMB/UNC printing goes down, the client will attempt to connect to it for a while, then attempt to reconnect to the LB. The LB hands the client to a new print server, then the client establishes a direct connection to that new print server like the process outlined above. Therefore, SMB/UNC printing survives print server failure, after a pause.
There are a few configuration changes required on print servers to support Load Balanced SMB/UNC printing. These changes are outlined here1 and also refer to the Configuration Changes require to print servers to support Load Balanced SMB/UNC Printing section below.
Note that you only need the ports 135-139, 445 to be proxied, not 1024-65535. It is important to exclude the wider set of ports, because doing so will create a very high resource requirements on the proxy server.
We use source balancing (affinity) so that all jobs from a single user/client will generally end up at a single print server. This will reduce the amount of cross server job lists required.
Configuration Changes required on print servers to support Load Balanced SMB/UNC Printing
The following configuration changes must be made to the print servers behind the load balancer to support Load Balanced SMB/UNC printing. These settings have been tested on Windows 2012 R2, and Windows 2016. When all changes have been made, reboot the server.
1. Registry entries
To enable the Print Servers to be accessed via a shared name, add the following registry entries on each Print Server.
Key: HKEY_LOCAL_MACHINE\SYSTEM\CurrentControlSet\Services\LanmanServer\Parameters
Value: DisableStrictNameChecking
Type: REG_DWORD
Data: 1
Key: HKEY_LOCAL_MACHINE\SYSTEM\CurrentControlSet\Services\LanmanServer\Parameters
Value: OptionalNames
Type: REG_MULTI_SZ
Data: haproxy (Note: the name of your load balancer)
Key: HKEY_LOCAL_MACHINE\SYSTEM\CurrentControlSet\Control\Lsa
Value: DisableLoopbackCheck
Type: REG_DWORD
Data: 1
Key: HKEY_LOCAL_MACHINE\SYSTEM\CurrentControlSet\Control\Print
Value: DnsOnWire
Type: REG_DWORD
Data: 1
2. Configure hosts file on each Print Server
On each Print Server, create an entry in the hosts file which has the IP address of the local Print server, and the name of the load balancer.
-
Open Notepad as administrator and open the HOSTS file stored in C:\Windows\System32\Drivers\etc.
-
Add an entry for the OptionalNames specified in the registry above, using the server’s local IPv4 address for resolution.
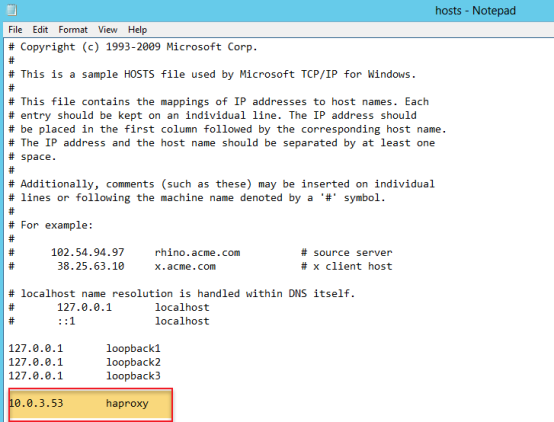
In the example above, 10.0.3.53 is the Print Server’s IP address and haproxy is the name of the load balancer.
Note: Ensure all the machines have proper credentials for connecting to each other (e.g. on the same domain).
Step 10: Load Balancing Pharos Sentry Print (SE50)
Follow these steps on all Uniprint Print Servers that are used for load balancing.
1. Using the Updater Service, update to the latest Pharos Systems Sentry Print Service (v 3.76.6 or later).
2. Create a backup of the file generalSettings.xml in C:\Program Files (x86)\Pharos\SiteService\App_Data.
3. Open the command prompt in administrator mode and uninstall the Pharos System Sentry Print Service using the following command
msiexec /uninstall "C:\Program Files (x86)\Pharos\bin\Mps.Client.Mfp.Install.msi"
Upgrading the Site Service does not install alternate name certificates (which is required for load balancing) so you'll need to uninstall the Site Service and delete existing certificates. Step 5 shows you how to reinstall the Site Service using a command prompt. This will create alternate certificate names.
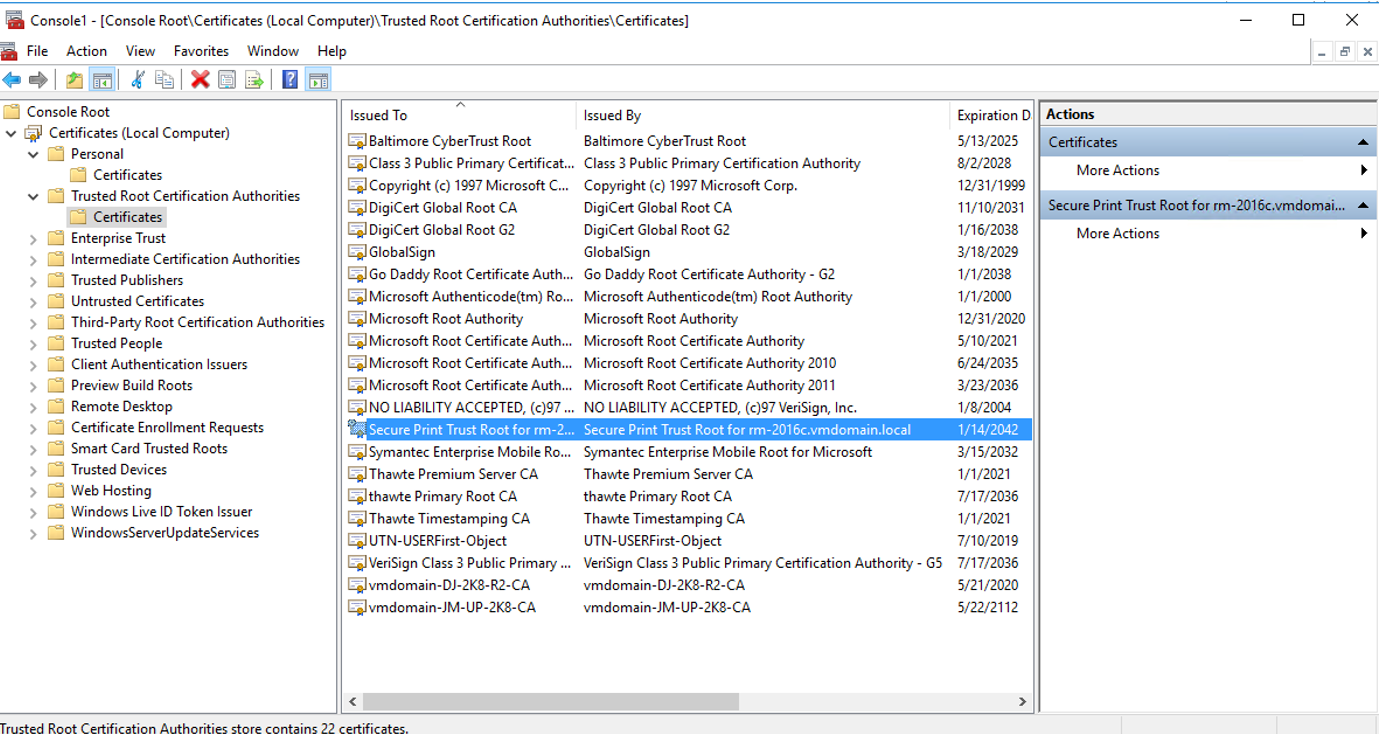
4. Delete the existing Secure Print Trust Root Certificate as follows:
4.a Delete from Personal Certificates
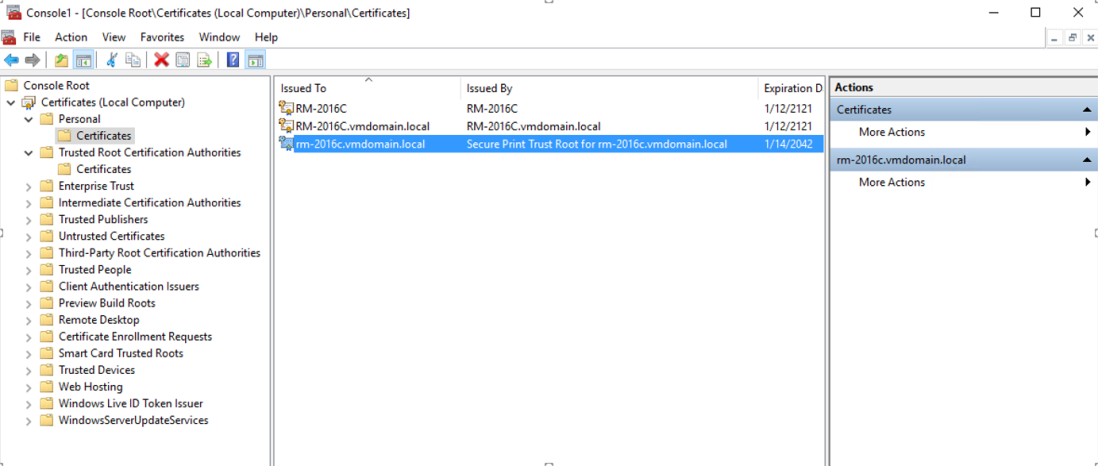
4.b Delete from the Trusted Root Certification Authorities
5. Reinstall the Pharos Sentry Print Service. This will create the new certificates with an alternate name.
msiexec /i "C:\Program Files (x86)\Pharos\bin\Mps.Client.Mfp.Install.msi" INSTALL_LOCATION="C:\Program Files (x86)\Pharos\SiteService" APPDATA_LOCATION="c:\ProgramData\PharosSystems\SiteService" REBOOT=ReallySuppress /qn /l*v "C:\Program Files (x86)\Pharos\Temp\SiteServiceInstall.log" CERT_ALT_NAMES="haproxy.pnz.co.nz"
Replace the value of the CERT_ALT_NAMES with the name of your load balancer.
6. Copy the backed up generalSettings.xmlfile (created in Step 2) into the original location (C:\Program Files (x86)\Pharos\SiteService\App_Data).
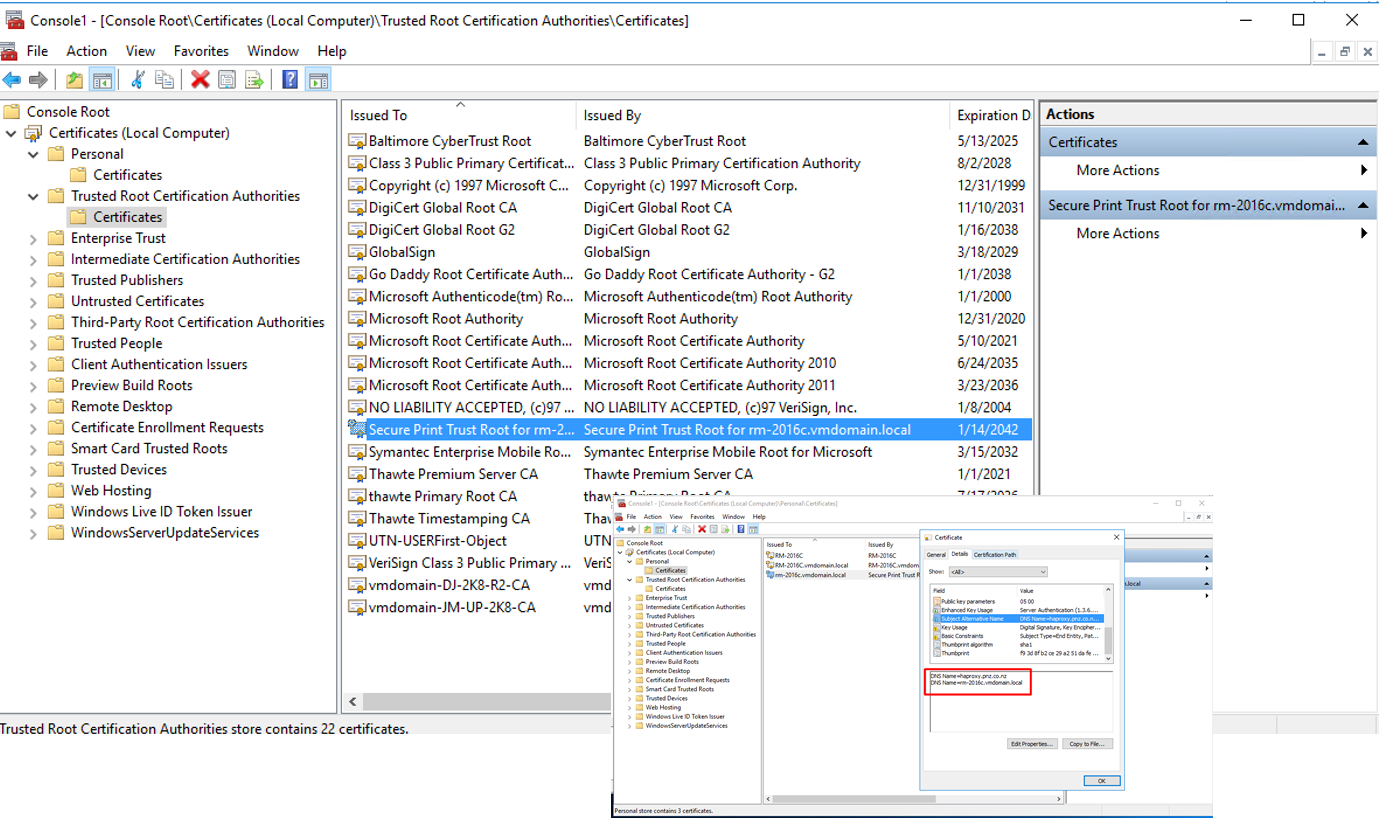
7. Make sure that the new certificates are created and the Pharos Systems Site Service is running.
7.a Select Certificates as shown in the image below.
7.b Navigate to the Details tab.
7.c. Click on Subject Alternative Name.
7.d. You should see your Print Server and load balancer DNS Names.
8. Export and Import the Certificate. After the certificate is created, it needs to be imported into the SE50 printer to validate the server.
8.a. Using the Certificate console, open Certificates > Trusted Root Certification Authorities > Certificates.
8.b. Select the Secure Print Trust Root certificate and export the certificate to a file.
8.c Log on to the printer's web console and follow the steps to import a certificate. The following shows how to import the certificate on HP printers.
- Navigate to the Security tab.
- Select Certificate Management and import the certificate by browsing to the location of the file you want to import.
- After a successful import, you'll see your imported Secure Print Trust Root certificate in the list of Certificates. Note: Make sure to import all certificates from print servers that are part of the load balancing.
Step 11: Monitoring HAProxy metrics
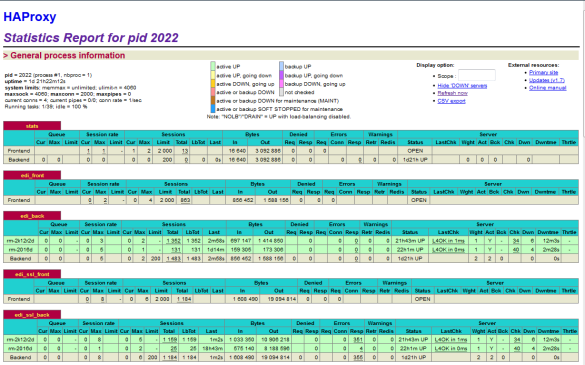
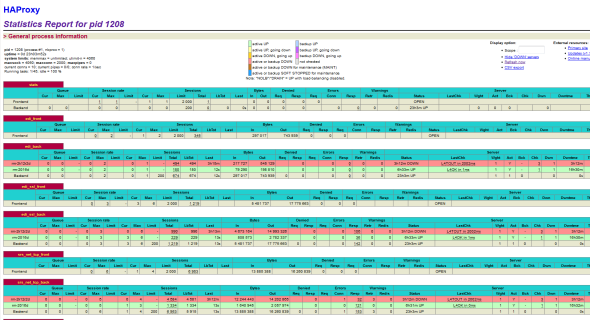
HAProxy includes a web interface for monitoring the load balancer as well as the servers behind the load balancer. It shows how many servers are connected, which Uniprint Print Servers are up or down, and other pertinent information about your load balancing solution.
The HAProxy web page monitoring page is enabled by modifying the haproxy.cfg file as follows:
# Connect on port 9000 to see statistics. NOTE: no password for now
listen stats
	bind :9000
	mode http
	stats enable
	stats hide-version
	stats realm Haproxy-Statistics
	stats uri /
	#stats auth admin:password
To view the monitoring web page, open your load balancer’s URL http://<HAProxyServername>:9000/ using a web browser. Each server is color-coded according to their status. Green highlight indicates that servers are up, and red indicates that servers are down.
The following shows an example of the HAProxy web monitoring page with two servers up and running.
The following image shows one server is down, highlighted in red.
Best Practice
If you are going to take a Print Server down for any length of time, you can mark the server as “inactive” in the Server Configuration context in Pharos Administrator. This prevents the load balancer from attempting to connect to the server and keeps things flowing faster. The system’s knowledge about a user’s jobs held on this server may not be available again once the server is set back to “active”.
Known Issues
While MobilePrint jobs (i.e. upload and email) are processed without any issues, configuration changes and testing email functionality do not work as expected in a load balancing environment.
Typically, the MobilePrint Workflow Service connects to one Pharos API server and listens to that for notifications. In a load balanced environment, any one of the Pharos APIs may be the one that sends a notification when the configuration is changed through the Print Center, or an Email Test is requested. If MobilePrint Workflow is ‘listening’ to a different API, it will not get the email test request or the configuration change notification. For example, clicking on the Email Test button in the Print Center UI shows a timeout error.
To work around these issues:
- Restart the MobilePrint Workflow Service after changing configuration settings.
- Open a web browser tab for each of the Print Center/APIs in the load balance setup and connect to the Print Center on each of the load balanced servers. Click the ‘Email Test’ button in each of these so that each Pharos API sends off an email test request. The MobilePrint Workflow Service will ‘hear’ the one that comes from the API that it is currently listening to and will respond to that one. So, all the other test requests will time out, but one of them should give a result.
Troubleshooting
If you encounter the error "Your balance could not be retrieve at this time. Unable to complete the request due to network issues. Please try again later.", you may need to increase the Network Timeout setting (in the Secure > Settings screen) to 30 seconds.