Uniprint Print Center Deployment Strategy: Small Deployments
This setup is suitable for small deployments, i.e. sites running less than 3 Uniprint Print Servers.
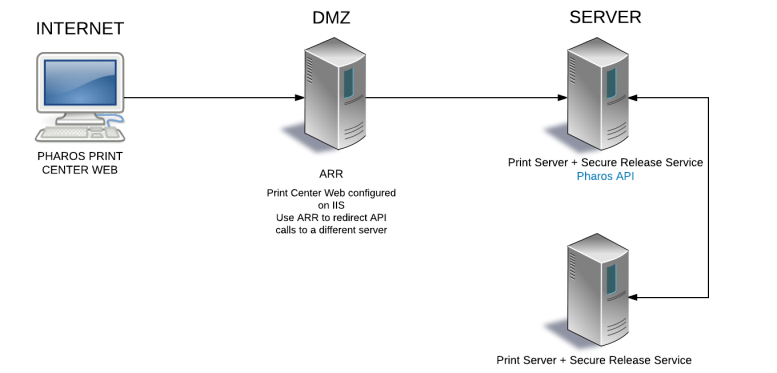
The following scenario illustrates configuring Print Center Web files and Print Center Services (Pharos API) separately. The Print Center Web is installed on a server which is on a DMZ and the Print Center Services (Pharos API) is installed on another server which may or may not have internet access. The Print Center Services (Pharos API) is dependent on the Uniprint Print services; therefore it is installed on one of the Uniprint Print Services machines.
ARR is installed on the machine where the Print Center Web is installed (effectively using it as a reverse-proxy server), and by using the URL Rewrite Module, the Print Center Web redirects web requests to the appropriate Print Center Services machine (Pharos API).
The following setup includes:
- Server 1: The machine where Print Center Web files are installed
- Server 2: The machine where Print Center Services (Pharos API), Principal Services and Print Services are installed
Small Deployments with SSO
Deploying Print Center (with a single Pharos API) to an SSO environment requires a server farm. Follow the steps outlined in Scenario 2: Medium or Large Scale Deployments section of this document.
Step 1: Install Application Request Routing (ARR)
In this set up, you must install ARR on the same machine as the Print Center Web component. The following section provides instructions on where to obtain and how to install the Application Request Routing (ARR).
Notes on installing ARR:
- IIS 7.0 or higher is required to run ARR.
- Windows Server 2012 and Windows Server 2012 R2 require ARR 3.0. You can install ARR 2.5 on Windows Server 2008 or Windows 2008 R2.
To install ARR:
ARR can be installed from the Microsoft website. The necessary pre-requisites for ARR will be installed as part of this install.
Step 2: Enable Request Routing in ARR
After installing ARR, the next step is to enable proxy in ARR to allow requests to be forwarded to Pharos API servers.
To enable proxy in ARR:
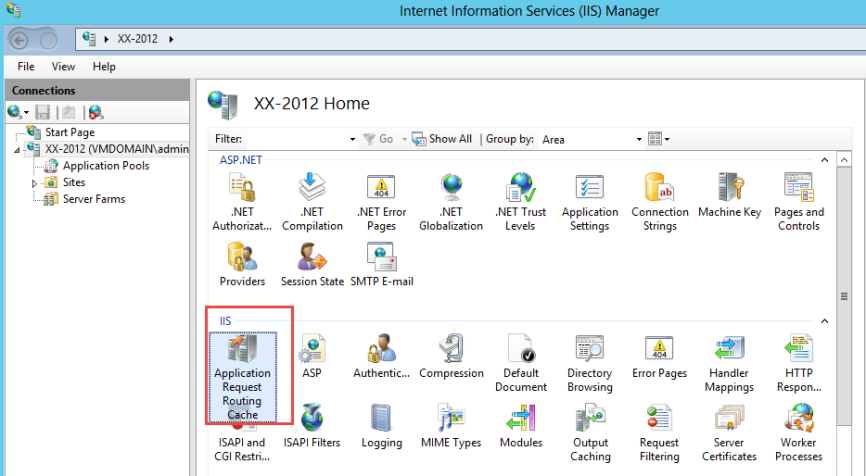
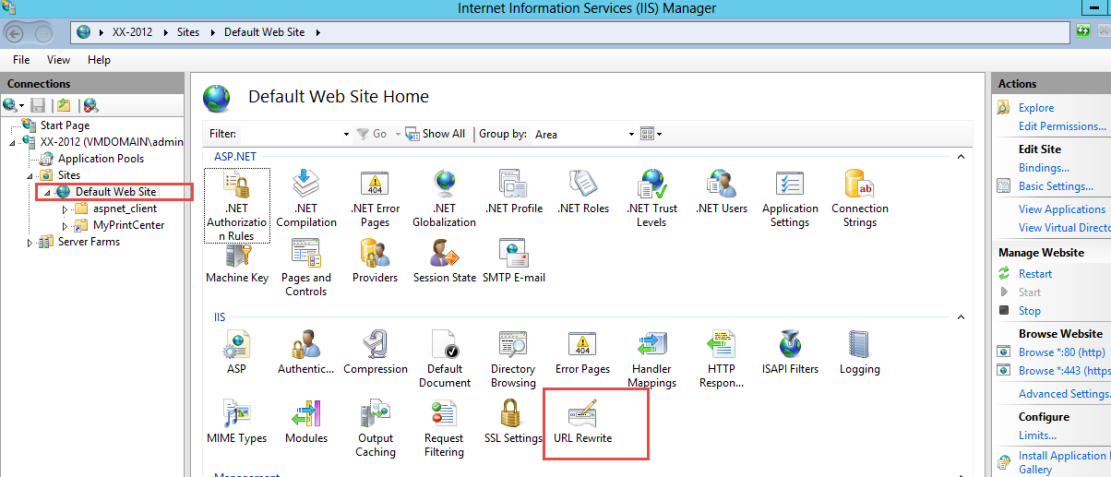
- Start IIS Manager and then click on your server.
- Double-click on the Application Request Routing Cache option under IIS.
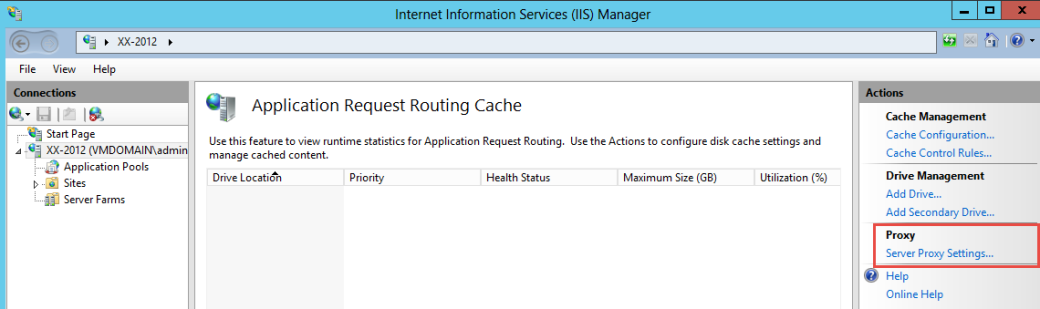
- In the Actions pane, click on the Server Proxy Settings.
- On the next screen, check on the Enable proxy option. Also, you will need to make sure that the Reverse host in response headers option remains unchecked or the redirection to the servers will not work.
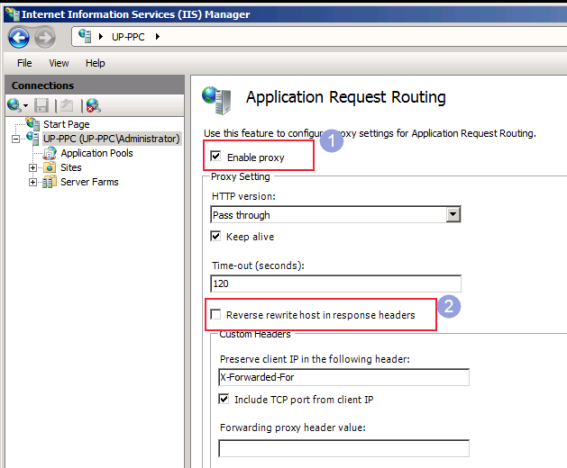
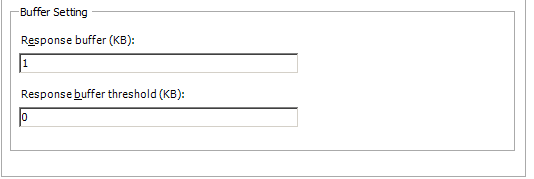
- Under the Buffer Setting section, set Response buffer to 1 and Response buffer threshold (KB) to 0.
Step 3: Create a URL Rewrite rule
Configuring a URL Rewrite rule allows queries directed at one server to be passed to another server. This allows us to separate the Print Center Web from the Print Center Services (Pharos API) while still allowing the Print Center to think that the Pharos API is installed on the same server.
1. Expand Sites, click on the Default Web Site, and then double-click on the URL Rewrite option. If you cannot find the URL Rewrite option, you need to install this module.
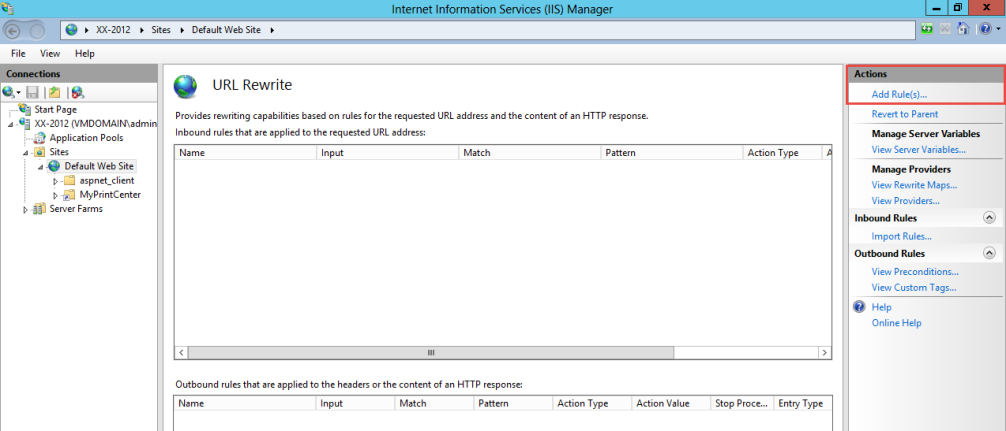
2. The URL Rewrite screen opens. In the Actions pane, click Add Rule(s).
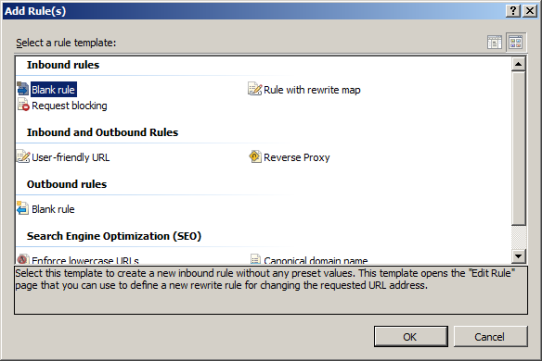
3. In the Add Rule(s) dialog box, click on the Blank Rule and then click OK.
4. Define the URL Rewrite rule by providing information, such as the name of the rule, pattern to use for matching the URL string, and the Rewrite URL pattern. All URLs matching the pattern will redirect requests to Pharos API.
- In the Pattern field, enter the following string: ^PharosAPI/(.*). This regular expression string specifies the pattern that is used to match URL paths that starts with Pharos API (after the domain name in a web URL.) For example, http://example.com/PharosAPI/Settings matches starting after ‘http://example.com/’ and captures everything in the URL that follows ‘PharosAPI/’, in this case, ‘Settings’.
- In the Action Type drop-down list box, select Rewrite.
- In the Action Properties field, enter the string
https://< PharosAPIServerName>/PharosAPI/{R:1}
This string tells the ARR which server to call and how to make the call.
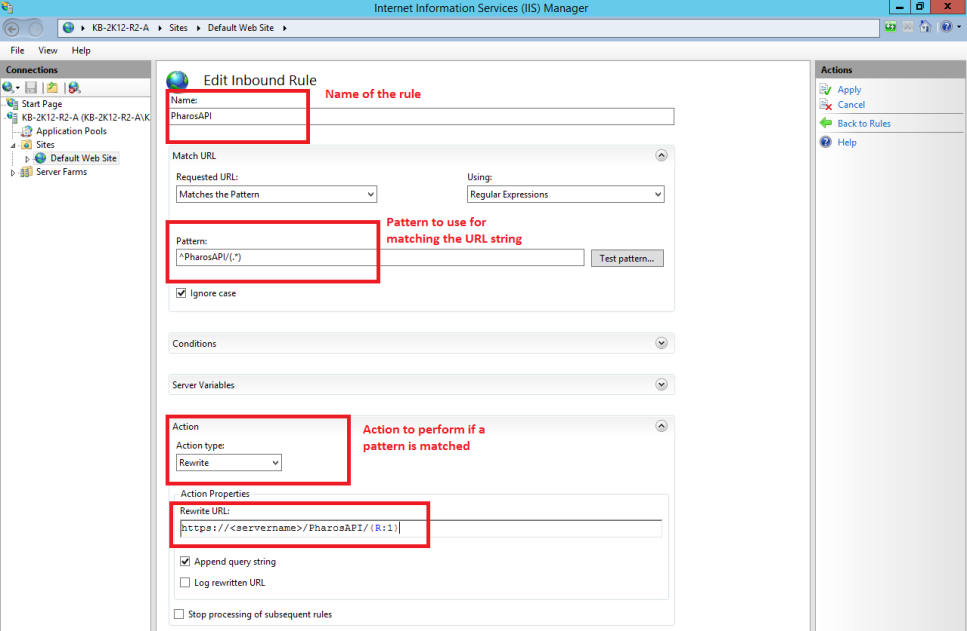
5. Click Apply to save the changes.
Export and Import SSL Certificate
When installing the Print Center Services (Pharos API), it installs a self-signed certificate. This certificate needs to be imported into the machine running the Print Center Web in order for the Print Center to work when using ARR. Since ARR is being used to proxy requests from one server to another so that they appear as a single server, the server certificates need to be trusted.
If the SSL certificate is not from a trusted source, the certificate is rejected by default because this presents a security risk. The API just like the Print Center Web uses a self-signed certificate if the server does not already have a certificate, which may either be an existing self-signed or a trusted certificate from valid provider e.g. Verisign. In order that a client can use a self-signed it must be accepted as trusted.
So in order that the Print Center Web using ARR can communicate with the Pharos API using a secure channel just as if it was on the same server, the server certificate from the API needs to be imported as trusted.
In the following section, you will be shown how to export the certificate installed on the Print Center Service (Pharos API) and then import it to the Print Center Web (running the ARR).
Exporting Certificate
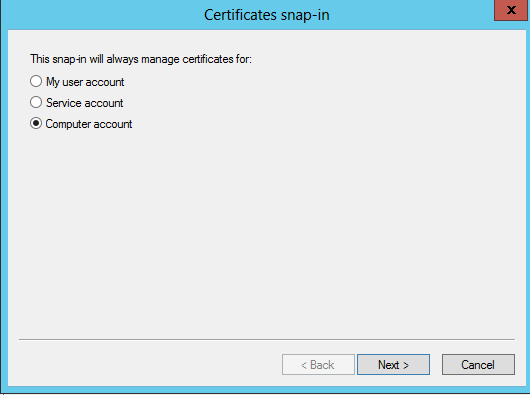
1. Start the Microsoft Management Console (MMC) by typing mmc in the Run dialog box and then clicking OK.

2. On the File menu, click Add/Remove Snap In.
3. Select Certificates from the Available Standalone Snap-ins dialog box and then click Add.

4. Select Computer Account.
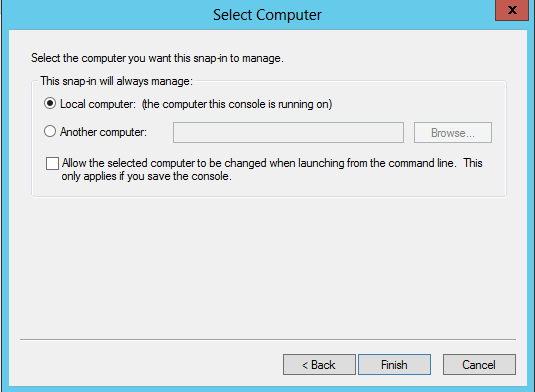
5. Select Local Computer and then click Finish.
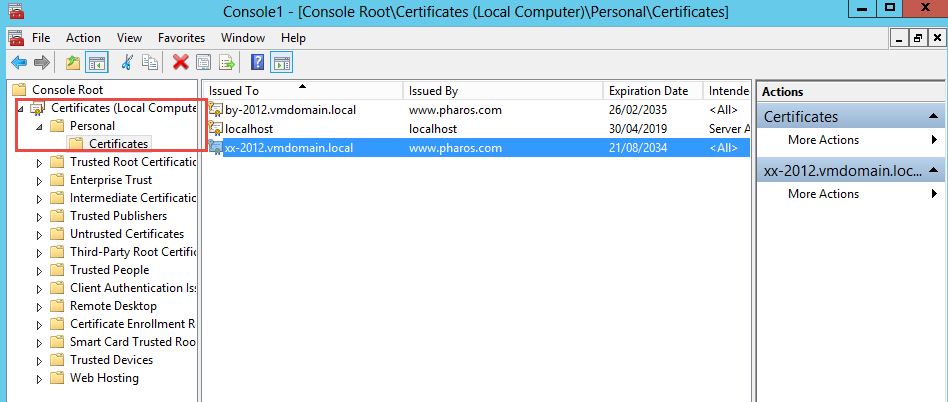
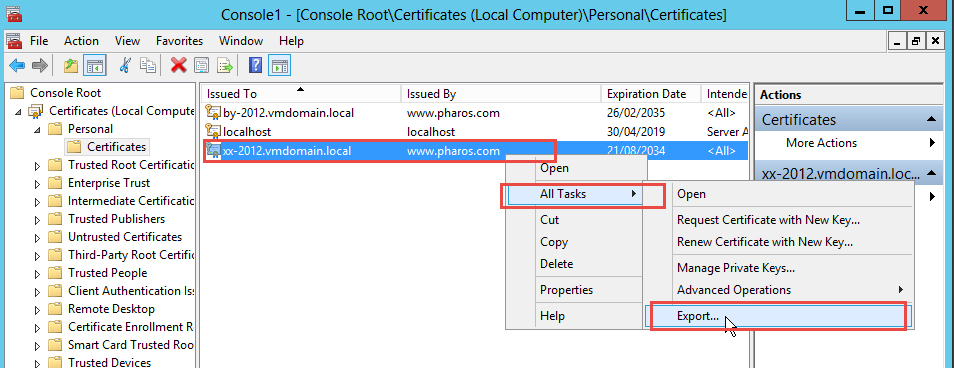
6. Click OK. A certificate using the domain name will be installed in Pharos API installation.
To export the certificate:
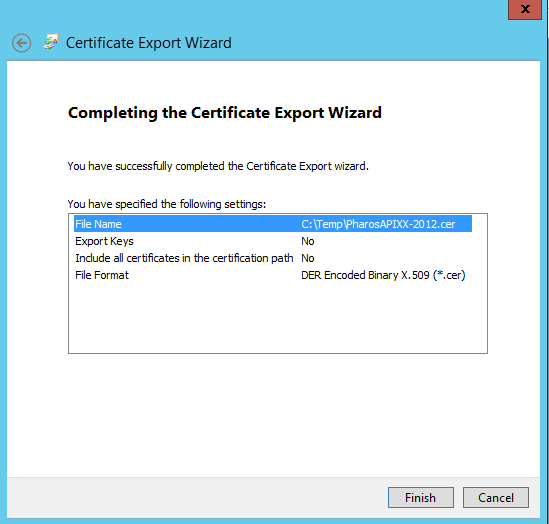
1. Choose the certificate, right click, select All Tasks and then click Export. This opens the Certificate Export Wizard. Click Next to continue.
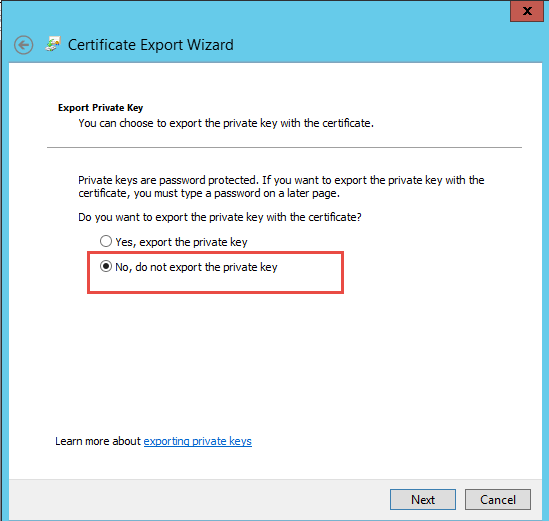
2. Choose No, do not export the private key.
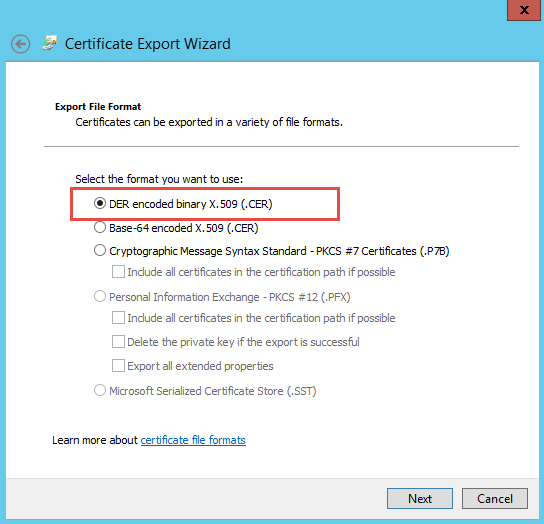
3. Select the format that you want to use.
4. Specify the name of the file you want to export, and then browse to the location where you want to save it.
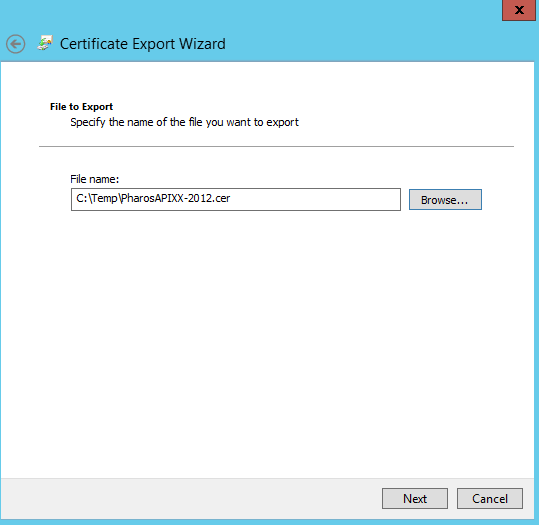
5. Click Finish to complete the certificate export.
Importing Certificate
You will need to import the Print Center Services (Pharos API) certificate to the machine where Print Center Web is installed.
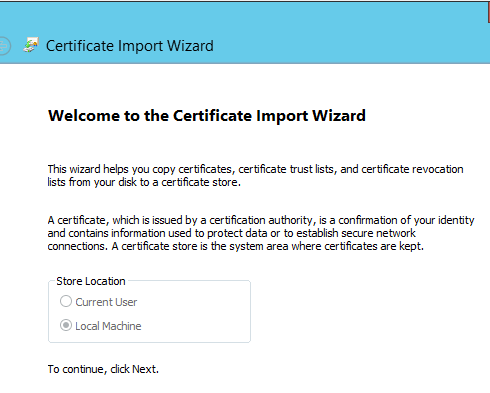
1. Start the Microsoft Management Console (MMC) by typing mmc in the Run dialog box and then clicking OK.
2. On the File menu, click Add/Remove Snap In.
3. Select Certificates from the Available Standalone Snap-ins dialog box and then click Add.
4. Select Computer Account.
5. Select Local Computer and then click Finish.
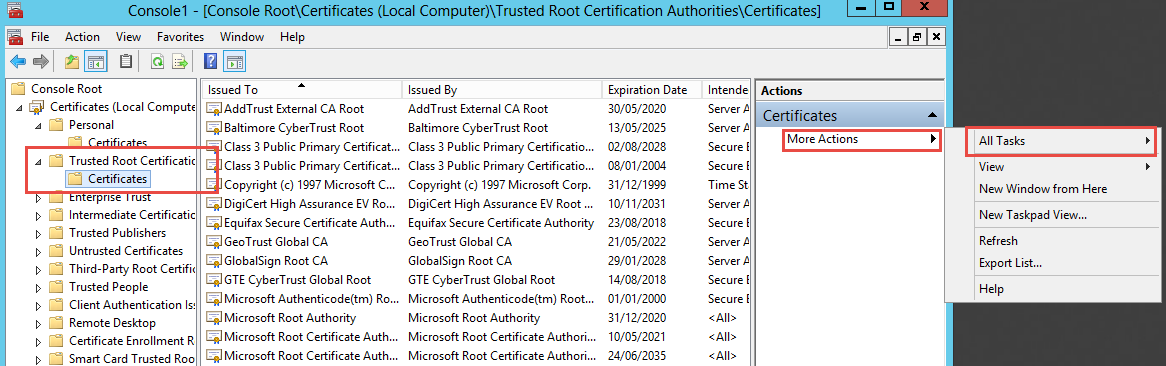
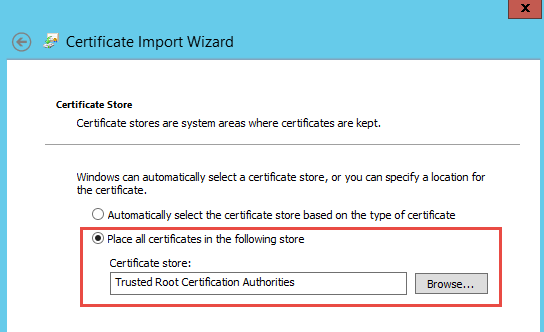
6. Expand the Certificates under Trusted Root Certification Authorities and then click on More Actions > All Tasks > Import.
7. Click Next to Continue.
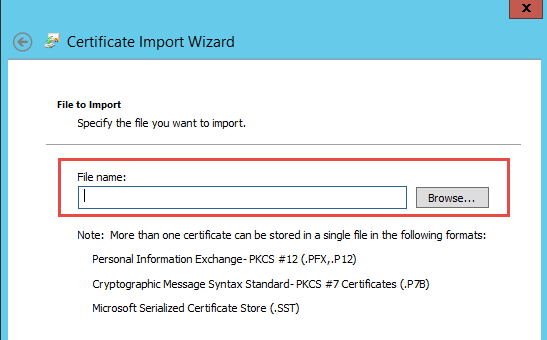
8. Browse to the location of the file that you want to import and then click Next.
9. Place the certificate in the “Trusted Root Certification Authorities” store.
10. Click Finish to complete the Certificate Import Wizard.
If the Server on which Print Center Services (Pharos API) is installed has CA, then install CA root certificate as a Trusted Root Certificate on the ARR machine.
Allow large file upload in IIS
By default, IIS web server allows for limited file size to be uploaded to the web server. For IIS 6 and IIS 7, the default maximum file upload size is 4 MB and 28.6 MB respectively. IIS 7 returns a 404 error (HTTP Error 404.13 - CONTENT_LENGTH_TOO_LARGE) if a file larger than 30 MB is uploaded. In order to allow for larger file size uploads, you must edit the maximum allowed content length.
Editing the Maximum allowed content length
- Open IIS Manager.
- Select the Default Website.
- Select Request Filtering and open it by double-clicking the icon. This opens the Request Filtering screen.
- From the Actions pane on the right-hand side of the screen, click Edit Feature Settings... link. The Edit Request Filtering Settings dialog displays.
- In the Request Limits section, enter the appropriate Maximum allowed content length (Bytes) and then click the OK button.
- Restart IIS.
Verify the health of the Pharos API
One way to verify that the Pharos API is up and running is to open a web browser and browse to this url - https://server/pharosapi/logout. A healthy Pharos API returns an empty HMTL page with HPP 200 (OK).
You have now finished setting up your Pharos Print Center on ARR. The next step is to configure Uniprint to work with the Pharos Print Center. Authentication, charging, costing, and printing components should be set up first before logging on to the Print Center website. For more information on how to set up Uniprint for Pharos Print Center, please refer to the “Pharos Print Center Guide” found in the Pharos Community.