Installing Pharos Reports
The Pharos Reports application is installed using the main installers on the Pharos disk image.
Requirements
Pharos Reports can be installed on any computer running the following platforms:
- Windows Server 2022
- Windows Server 2019
- Windows Server 2016
- Windows Server 2012 R2
- Windows 7 Business Edition, Enterprise Edition, and Ultimate Edition
- Windows 8 Basic, Pro, and Enterprise Editions
- Windows 10
- Windows 11
Microsoft .NET Framework Requirements
Before installing Pharos Reports, you must first install .NET Framework 4.6.1. The installer for the .NET Framework is available on the Pharos disk image at common\win32\DotNETFramework.
Installation
To install the Pharos Reports application on a PC:
- Browse to the Pharos disk image and run setup.exe in the root directory of the disk image.
- Select Install Pharos from the main splash screen.
- Click Next at the Welcome screen.
- If any other Pharos components are installed on this PC, they will be listed. Click Next.
- Leave the install directory as the default. Click Next.
- Select Additional Components and click Next.
- Select Reports and click Next.
- Supply the network name of the machine on which you installed the Pharos Database Service and click Next.
- Check the installation details and click Start.
- The Pharos Reports installation will commence. Once the installation is complete, click Finish.
Once Pharos Reports is installed, you can start it from the Start menu at Programs > Pharos.
Installing Pharos Reports using non-standard Database name
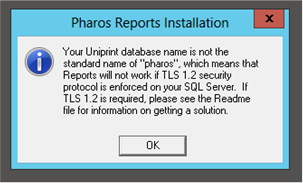
The following information screen is displayed when your Uniprint installation uses a non-standard Database name (i.e. it is not using the default DB name ‘pharos’). Please see the readme file for information on getting a solution.
