QR Codes
The QR Code Release feature is available from Print Center 4.11.2 .
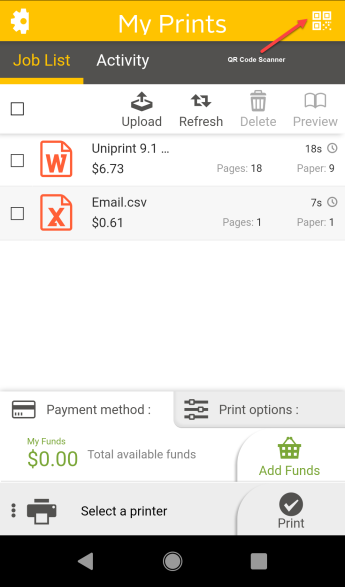
Uniprint's Touchless QR Code Release is simple and fast: users simply walk up to a printer and use the Pharos Print app (iOS and Android) to scan a QR code affixed to the printer. Users can manage the print jobs in their queue and confirm or change job details right from their mobile device—without ever making contact with the printer interface.
The QR code scanner can be found on the upper right-hand side of the mobile app. If the Pharos Print App is not installed, users can scan a QR Code from their camera app, this will launch the Pharos Print Center via a web browser. After logging in, the user can release jobs in the same manner as with the Pharos Print App.
The QR Codes section in the Admin tab allows site administrators to generate and download QR codes to attach to printers.
Mobile Applications Settings
Enable QR Code Scanner button - When enabled, the QR Code Scanner button will be displayed on the Pharos Print mobile app. You can find the button on the top right-hand corner of the screen. Tap this button to scan the QR code attached to the printer.
Printer QR Code Labels - PDF file generation
This section enables you to customize the information displayed on your QR Code labels. You can change the following elements of the QR Code label.
| QR Code Element | Description |
|---|---|
|
Label Rendering Layout |
Select how the elements (e.g. logo, the QR code, and the printer fields) in the QR code label are laid out. |
|
Label Logo |
Change the logo on the QR Code. You can customize the QR Code using your company logo, for example. |
|
Label line 1 and Label line 2 |
Select the printer fields that you want to display on your QR Code label. It can be any of the following:
|
Preview
The Preview section shows how your QR code labels are rendered.
Downloading the QR Code
- Click Download to download a laser printer label template (standard 2 x 4” format) and then open or save the file.
- Print the QR code labels.
- Attach the QR code labels to the appropriate printers based on the labels.
Downloading of QR codes for printers is dependent on the admin user who is logged on to the Print Center to create and download the QR codes having permission to print from Print Center to all the devices the admin wants to create QR codes for. This setting is configured in Pharos Administrator under User Groups > Print Center Device Access. If the admin user is in a group which does not have any devices specified in this property, then they have permission to print from Print Center to all devices and will therefore will be able to download a full set of QR codes. If they are in a user group which has specific devices selected, then they will only be able to download the QR codes for those devices.
Using QR Code Release when Print button is disabled
The Display Print Button option in Pharos Administrator (under System Settings > Print Center Settings), controls whether the Print button is visible in the Print Center. When the Print button is visible, users can manually search/choose printers from the device list also displayed in the Print Center or the Pharos app.
It is possible to configure the system such that the Print button (and printer list) is not visible in Print Center or the Pharos Print App, but QR Code Release is enabled, so that users can only release by scanning the QR code on the device they are currently at. This prevents accidental release to an incorrect device.
To configure this:
- In Pharos Administrator, uncheck the Display Print Button option in the System Settings > Print Center Settings context.
- In Print Center, set the Enable QR Scanner button option in the QR Codes tab.