Uniprint Technote: Setting up Grants
Overview
Users charge their printing expenses and other resource usage using their personal account or through Third Party Charging. Third Party Charging uses the concept of Cost Centers. A Cost Center is an entity to which printing costs and other resource usage is charged. Depending on how you have configured your Uniprint system, users will be able to see the Cost Centers at the workstations or Release Stations.
When users print a job from a Popup client, they will be presented with a list of Cost Centers to charge their print jobs to. Similarly, when users release print jobs from a Network Terminal, they will also see a list of Cost Centers that they can charge their print job to.
A Grant is a special type of Cost Center. However, unlike Cost Centers, Grants can either have a budget limit or an expiry date. Grants will no longer be available to users for charging if either the budget limit is exhausted or the Grant has expired.
Like standard Cost Centers, Grants are configured in the Charging > Third Party Charging > Charging Models context of the Pharos Administrator.
Important notes about Grants
- A Grant can be set in Arrears, meaning it can go into debt.
- Grants cannot be converted to Cost Centers and vice versa.
- A user can have multiple Grants.
- A category may include a mixture of Grants and Cost Centers.
Setting up Grants
A Grant is effectively a Cost Center with budget allocation, and it can be configured in the same way. However, with Grants, you must set up additional properties such as Enforce Budget Limit, Grant Budget, Users Quota, etc.
Step 1: Adding a Charging Model
To add a new Charging Model:
- Go to the Charging > Charging Models context in Pharos Administrator.
- In the Charging Models Actions Pane, select the Insert Charging Model button. This opens the Charging Model Insert dialog box, which collects the necessary information and creates a new Charging Model entry with it.
- Enter a name for the new Charging Model and click OK. The new Charging Model entry is inserted into the Pharos Database.
After creating a Charging Model, you can now add Categories and Cost Centers to it.
Step 2: Adding a Cost Center Category
You can add Cost Center Categories at Charging > Third Party Charging > Charging Models context.
Grants can only be created on a single level Cost Center category. If a Cost Center category contains Grants, you will no longer be able to insert another category for the same Charging Model. If you want a Charging Model with multiple categories, you must create a new Charging Model without Grants.
To add a new category:
- In the Charging Models Actions pane, select the Insert Category button. This opens the Insert Category dialog box which collects the necessary information and creates a new Cost Center Category entry with it.
- In the Insert Category dialog box, configure the following properties. Note that a property with a small error icon next to it is a mandatory property. You must supply values to these properties to complete the insert operation.
- In the Name field, enter a name for the new Category.
- In the Charging Model field, select the Charging Model that the Category will be associated with. By default, the Charging Model is set to the Charging Model of the currently selected row.
- Click OK. The new Cost Center Category entry is inserted into the selected Charging Model. The next step is to add either or both Cost Centers and Grants to the Category.
Categories are listed in the order that they are created. The Charging Model of a Category cannot be changed once the object has been created.
Step 3: Adding a Grant
To add a new Grant:
- In the Charging Models Action pane, select the Insert Grant button. This opens the Insert Grant dialog box which collects the necessary information and creates a new Grant entry with it.
- In the Cost Center Name field, enter a name for the new Grant. Each Grant should be named after the project that it represents, e.g. AT & T Education Grant.
You can add a Grant to a Charging Model with one category level only. If the Charging Model has more than one category level, you will not be able to add a Grant.
- Enter the description of the Grant.
- In the Grant Budget field, enter the total amount to be assigned to the Grant.
- In the Expiry Date field, select whether you want the grant to never expire (meaning it will be available until the Grant Budget is depleted) or enter the date when you want the Grant to expire.
- Click OK. The new Grant entry is inserted into the Category.
Grants can also be imported in bulk from an external source. For more information on how to import Cost Centers, please refer to "Importing Cost Centers" topic.
Step 4: Setting up Grant Constraints
Categories can be restricted so that only certain Pharos Users or User Groups can have access to them. You can impose restrictions by applying constraints to the Grant belonging to a specific category. If no constraints are configured, all Grants in each Category will be available for selection at the Release Stations or the Popup clients.
Two kinds of constraints can be configured for each Grant:
- Users Quota Constraints specify which Users have permission to use a Grant. In addition, this is also where you specify how much (maximum amount) each user can spend.
- User Group Constraints determine which User Groups will be allowed to use the Grant in the category. The User Groups constraints act like permissions on Grants.
a. Enabling Grant Constraints
By default, constraints are disabled. Constraints must first be enabled at the Cost Center Category level and then set up individually for each Grant.
You can enable constraints in the Category level at Charging > Third Party Charging > Charging Models. The following Cost Center Category properties allow constraints to be enabled or disabled.
- Enable User Constraints
- Enable User Group Constraints
Enabling User Constraints
Enabling User constraints means that only certain users will be given permission to use the Cost Centers or Grants in the selected category.
To enable user constraints for a category, select "Yes" from the combo box in this field. By default, this is set to “No”, which means that no user constraints will be applied, and all users will have access to all Cost Centers in this category.
Enabling User Group Constraints
Enabling User Group constraints means that only certain User Groups will be given permission to use the Cost Centers or Grants in the selected category.
To enable user group constraints for a category, select "Yes" from the combo box in this field. By default, this is set to “No”, which means that all groups will have access to all Cost Centers in this category.
b. Configuring Grant Constraints
Constraints are set up individually for each Grant at Charging > Third Party Charging > Charging Models > [selected Charging Model] > [selected Category] > [selected Grant].
Configuring Users Quota Constraints
The Users Quota determines which users have permission to use the selected Grant and specifies the maximum amount each user can spend.
To configure the User Quota for each User:
- Select the Grant for which you want to set up the User Quota.
- In the selected Grant, click the editing button at the end of the Users Quota property. This opens the following dialog:
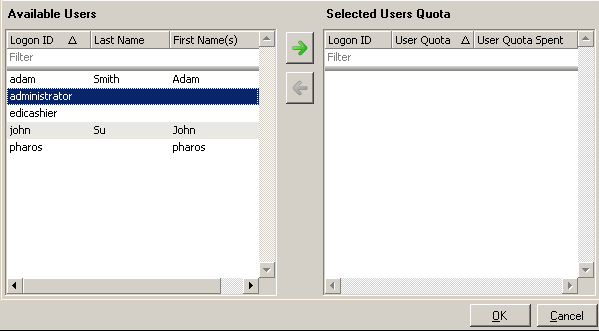
- From the list of Available Users, select the users who will have access to the Grant (Crtl-A to select all users or hold down the Ctrl-key to select specific users).
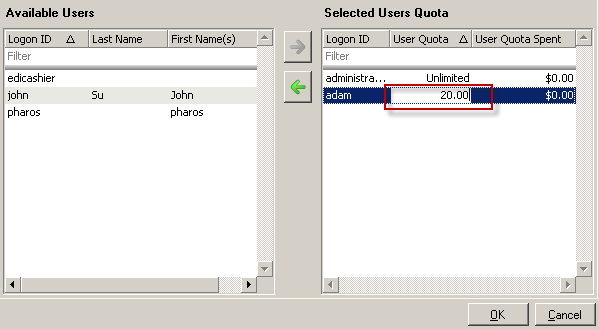
- Once you have selected all the desired users, click the green arrow button. All the selected users should now be in Selected Users Quota list.
- In the Selected Users Quota list, enter the User Quota that each user can spend. By default, User Quota is set to "Unlimited", which means that each user can continue using the Grant until the current Grant Budget is exhausted. To enter a new value, select the user whose User Quota you want to change and then double click under the User Quota column.
-
Click OK. The Users Quota will now have the status Constraints have been set.
Configuring User Group Constraints
Enabling User Group constraints means that only certain User Groups will be allowed use the Grants in this category.
To configure User Group constraints:
- In the Category level, select a Grant.
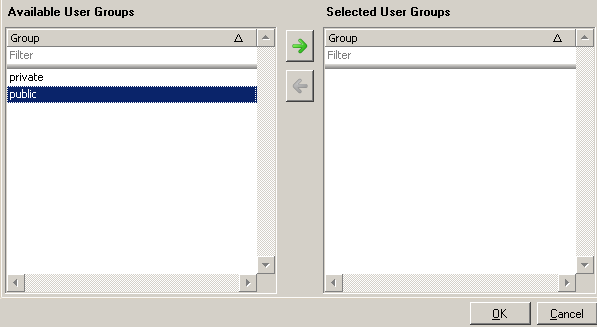
- In the Constraints category, click the editing button at the end of the User Groups property. This opens the following dialog box:
-
Select all user groups who will have access to the Grant, click the green arrow and click OK.
Constraints can be put in place automatically when importing a Cost Center.
Step 5: Configure the Pharos System that you want to use
After the Charging Model has been set up and Grant constraints configured, you must then instruct Pharos Uniprint to the Model.
Your configuration depends on which Pharos product(s) you want to use, for example, Popup clients, Off-The-Glass, Pharos Print Center.
- For Popup clients, you must configure Popup Questions
- Off-The-Glass requires you to configure the Release Stations
- Pharos Print Center requires you to specify the Charging Model in the System > System Settings > Print Center context.
Changing Grant Properties
Refer to the Changing Grant Properties topic for more information on the settings that can be configured for each Grant in Pharos Administrator.
Cost Center and Grants Comparison
This section lists the difference between Cost Centers and Grants.
-
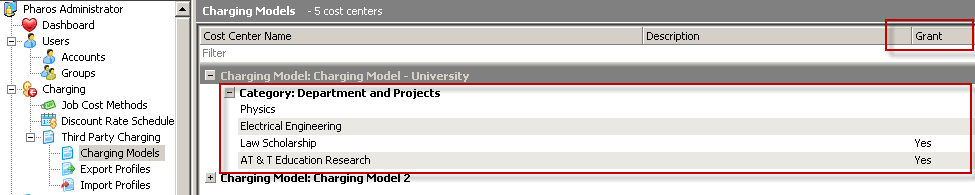
In the list of Cost Centers, the "Grant" column is set to "Yes" for Grants. For standard Cost Centers, this column is left blank. In the following illustration, Physics and Electrical Engineering are standard Cost Centers while Law Scholarship and AT & T Education Research are both Grants.
-
In the Properties window, a Grant includes the Grants category while a standard Cost Center does not have the "Grants" category.
-
With Grants, constraints can be set in the following categories Grants > Users Quota and Constraints >User Groups while in standard Cost Centers, constraints can be set at the Constraints category.