Uniprint Technote: Configuring Pharos Print Center to use Single Sign-on (SSO)
Pharos Print Center (v3.6.1 or later) adds support for Single Sign-on (SSO). This document covers how to update your Uniprint servers for SSO and configure Print Center to use SSO.
Overview
With SSO, users can log in to Print Center using their credentials from an identity provider. When a user logs into Print Center, they are redirected to the identity provider’s login page, rather than to the Print Center website and then redirected back to Print Center and logged on with their account.
Pharos Uniprint supports the following identity providers:
-
CAS (Central Authentication Service)
-
Shibboleth (Uniprint supports both standard and federation configurations)
Limitations
-
SSO is not supported on Pharos mobile apps (Android or iOS) or Pharos Station: Print Center Mode.
-
Keep Me Logged In is not supported in SSO.
-
Email registration is not supported on versions earlier than Uniprint 9.1. If upgrading from Uniprint 9.0 R2 SP5 (with SSO enabled) to 9.1, you will need to update the External Logon plugin point of your Print Center Bank to use the new default script shipped with Uniprint 9.1.
Other Documentation
Technote Pharos Print Center Deployment Strategy document for information on how to deploy Print Center using SSO with an Application Request Routing (ARR) setup.
Prerequisites
Before configuring Print Center to use SSO, make sure that your site meets the following requirements:
-
Uniprint servers are running Uniprint 9.0 R2 SP5 or later.
-
You have a working CAS or Shibboleth system.
-
You have the following information about your identity provider:
-
CAS - Base URL of your CAS server
-
Shibboleth - Identity Provider Metadata URL
-
-
A billing system is already in place (configured where users’ funds are stored and how to charge users for printing).
Configure SSO during off-peak hours
Every time you make changes to any SSO related changes in Pharos Administrator, restarting the Pharos API is required. This is done by clicking the Restart Pharos API button in the System > System Settings screen. You will also have to manually restart IIS on all Pharos API servers to apply the SSO settings.
Take note that this action restarts all the servers running Pharos API in the system and may have a significant impact during high usage periods. We strongly recommend configuring SSO during off-peak hours to minimize potential disruption of printing services.
Configuring PPC to use Single Sign-On (SSO)

Step 1 - Apply SSO update (applies to 9.0 R2 SP5 only)
Service Pack 5 includes updates to the following Pharos components. These updates are required to enable and configure SSO on your site.
-
Pharos Administrator
-
Print Center
-
Print Service
To apply SSO update to Uniprint 9.0 R2 SP5 via the Updater Service
-
Navigate to the System > Updater Service context in Pharos Administrator.
-
You should see the three components ready for download under the Available Package Updates section.
-
Download and install all three packages using the Updater service.
Applying SSO update on an ARR Setup
When Print Center is deployed using the Microsoft Application Request Routing (ARR) feature of IIS, here’s how to update your Print Center with SSO.
-
Update all the Pharos Print Server machines with Print Center 3.6.1 or later by installing the SSO update via the Updater Service.
-
After the Print Center Service is updated and running on all Print Server machines, follow these steps to update the Print Center Web application on the machine with ARR setup.
-
Log on to any of Pharos Print Server machine that has the 3.6.1 or later Print Center Service, and then navigate to the install directory (typically C:\Program Files (x86)\Pharos\Bin).
-
Copy the PharosPrintCenterSetup.msi installer to your shared network folder.
-
On the machine with the ARR setup, copy the new PharosPrintCenterSetup.msi to the install path \Pharos\bin directory. This overwrites the existing Print Center installer.
-
Execute the installer by double-clicking the PharosPrintCenterSetup.msi file. Follow the on-screen instructions to install Print Center 3.6.1 or later.
Make sure to select the Print Center Web component only, leaving the Print Center Services deselected.
-
Step 2 - Enable SSO in Pharos Administrator
After applying the SSO update, the next step is to turn on SSO in Pharos Administrator.
-
In Pharos Administrator, navigate to the System > System Settings context.
-
Expand the Print Center tab.
-
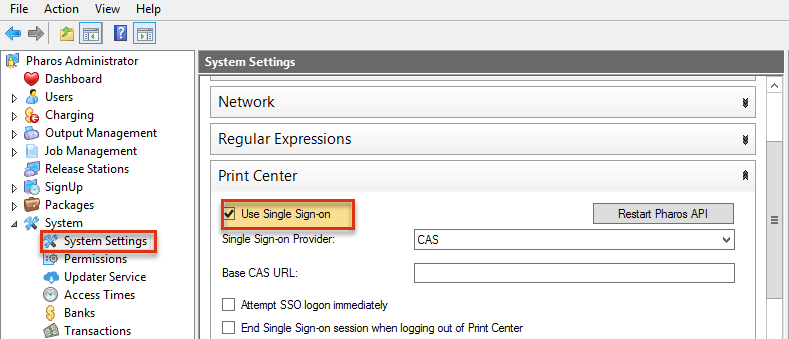
Enable SSO by selecting the Use Single Sign-on property. Enabling SSO displays SSO settings where you can configure details of your identity provider.
Step 3 - Configure Identity Provider
You are now ready to configure the details of your identity provider. The configuration settings displayed on Pharos Administrator depend on the SSO provider that you select in the Single Sign-on Provider setting.
Configuring CAS
-
In the Pharos Administrator, navigate to System > System Settings context.
-
Expand the Print Center tab and enable SSO by selecting the Use Single Sign-on checkbox.
-
In the Single Sign-on Provider field, select CAS.
-
In the Base CAS URL, enter the URL of your CAS server. This field should be your CAS URL without any of the standard CAS endpoints. For example, if your CAS login URL is https://example.com/cas/login, your base URL should be https://example.com/cas.
-
Configuring Shibboleth
-
In the Pharos Administrator, navigate to System > System Settings context.
-
Expand the Print Center tab and enable SSO by selecting the Use Single Sign-on checkbox.
-
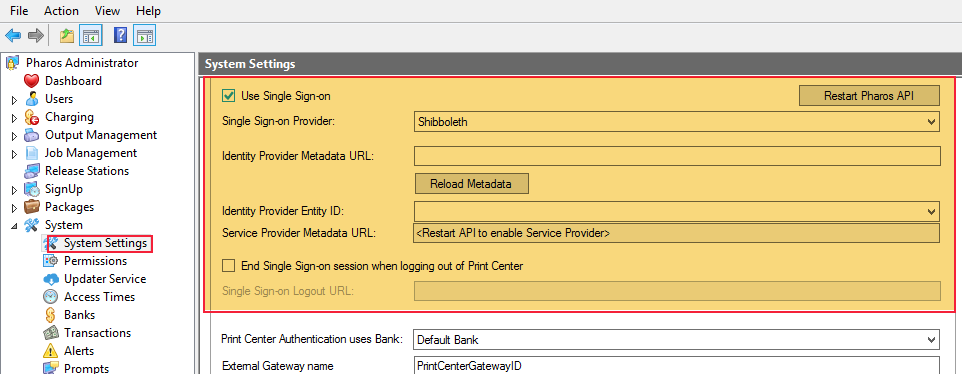
In the Single Sign-on Provider field, select Shibboleth. Properties related to Shibboleth appears.
-
In the Identity Provider Metadata URL field, enter the Metadata URL of the Shibboleth server.
-
Click on the Reload metadata button to get the entity IDs of your identity provider.
-
In the Identity Provider Entity ID field, select the entity ID that you want to use.
- Click on the Restart Pharos API button - as of Print Center 5.0.26 this button does not restart the Pharos API but it does fetch and complete the Service Provider Metadata URL field. (Ignore the warning about the impact of restarting the Pharos API for this step.)
-
Manually restart IIS on all Pharos API servers to apply the SSO settings (note that application pool recycle is not sufficient for this).
Uniprint is designed to use the Pharos API as the Service Provider. It does not currently support other ways of configuring Shibboleth Service Provider, such as installing Shibboleth Service Provider software on Internet Information Service (IIS)
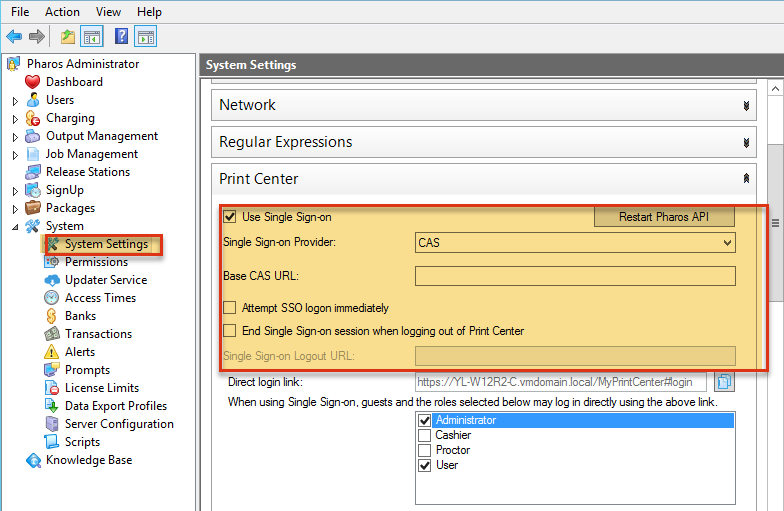
Uniprint 9.0 R2 SP5 Single Sign-on screen
Uniprint 9.1 Single Sign-on screen
In most cases, the configuration steps above should be sufficient. However, depending on how Shibboleth is configured in your organization, additional steps may be necessary. For example, you may want to configure an identity attribute other than the default uid as the primary username.
The following section provides instructions on how to configure your system to use an alternate attribute for primary username and how to control which certificate(s) the Pharos API should use for encryption.
-

Configuring Identity Attribute
When handling a login from Shibboleth, one attribute must be used as the primary username. By default, this value is the 'uid' attribute (oid 0.9.2342.19200300.100.1.1). Some systems may not be configured to provide this attribute, so the API may be configured to use another instead. The attribute may be specified in the same format as the Shibboleth configuration, e.g.urn:oid:0.9.2342.19200300.100.1.1.
However, there are also three commonly-used shortcut values available as well. They are:
'uid': urn:oid:0.9.2342.19200300.100.1.1
'eppn': urn:oid:1.3.6.1.4.1.5923.1.1.1.6
'mail': urn:oid:0.9.2342.19200300.100.1.3
To specify an alternate attribute, you will need to add a setting to the database with an SQL query.
For example:
To use the eppn attribute, use this query
exec print_center_settings_set 'Authentication', 'idp-logon-attribute', 'eppn'
To use a specific oid value directly, use this query instead
exec print_center_settings_set 'Authentication', 'idp-logon-attribute','urn:oid:1.2.34.5.6789.0'
After making a change to the logon attribute, the API should be restarted using the IIS Manager or the Restart Pharos API button in the Administrator.
In Uniprint 9.1, you can configure the identity attribute in the System > System Settings context (Print Center tab) of Pharos Administrator. Refer to the Shibboleth Settings on page Uniprint Technote: Configuring Pharos Print Center to use Single Sign-on (SSO) of this document for more information.
Configuring Shibboleth Certificates
Take note that changing the certificate also changes the service metadata, so you may need to update your identity provider too.
When configuring the service provider, the Pharos API selects a certificate to use for encryption. The public portion of the certificate is then included in the service provider metadata. You may prefer to control which certificate to use for this purpose. To configure this, a list of preferred certificates may be specified by thumbprint in the Pharos database. A certificate matching one of these thumbprints will be used if available. Otherwise, selection defaults to the previous behavior.
You can get the thumbprint for a given certificate from the certificate management MMC snap-in. The thumbprint values should have whitespace removed, and separated multiple values using the vertical pipe character. In the following examples, shorter values are used for clarity, but the thumbprint is usually longer.
To specify a single thumbprint
exec print_center_settings_set 'Authentication', 'sso-cert-thumbprint', '0a1b2c3d4f'
To specify three thumbprints, in the case of multiple API servers
exec print_center_settings_set'Authentication', 'sso-cert-thumbprint', '0011223344|aabbccddee|5566778899'
After making a change to the thumbprint setting, the API should be restarted using the IIS Manager or the Restart Pharos API button in the Administrator.
For Uniprint 9.1, you can configure Shibboleth certificates in the System Settings context of Pharos Administrator. Click the Manage Certificates button (next to Reload Metadata). For instructions on how to configure certificates used for Shibboleth encryption, Configuring certificates used for Shibboleth encryption
Configuring the Service Provider Entity ID to use the fully qualified domain name (FQDN)
The entityID is the unique identifier of the Service Provider (i.e., Pharos API). It is used by the Shibboleth Server to identify which service made the request. By default, the Pharos API generates the entityID using the short name of the server. In Uniprint 9.0 R2 SP5, to use the fully qualified domain name of a server, you will need to update the Pharos Database. In Uniprint 9.1 or later, there’s a setting in the System Settings context of Pharos Administrator that controls whether to use the short name or the fully qualified domain name (FQDN) of the server.
To use the server’s fully qualified name in Uniprint 9.0 R2 SP5, you will need to add a setting to the Pharos database with an SQL query.
exec print_center_settings_set 'Authentication', 'sso-entity-use-fqdn', 'true'
Restart the Pharos API using IIS Manager or click the Restart Pharos API button in the Pharos Administrator to apply the change.
In Uniprint 9.1, you can check on the Use FQDN for Service Provider Entity ID setting in the System Settings context of Pharos Administrator. When enabled, the Pharos API generates the entity ID string using the server’s fully qualified name instead of the short name. If the option is unchecked, the short name of the server is used as the Entity ID.
Using the Entity ID Registry key
If for any reason the methods above are not sufficient, for example, you want to use another format, there’s a registry key value you can set on each API machine to fully override the Entity ID. Browse to the Software\[Wow6432Node]\Pharos\Shibboleth, add a REG_SZ registry key named EntityId.
Step 4 - (Optional) Apply External Logon Script
Standard SSO setup allows user level privileges only. This means that when a user with administrative role logs in to Print Center, only the Job List and Activity tabs are available. They won’t have access to the admin tabs like Reports, Admin, etc. Also, when users log in using their email address or using a UPN style login, the name displayed in Print Center shows the entire email address.
Pharos provides an External Logon script which adds the following functions:
-
Enables Administrator, Cashier, and Proctor roles to have access to the administrative tabs (e.g. Reports, Theme, Admin) in Print Center. Users with admin roles must be added to the Pharos Database.
-
Provides the ability to adjust the username of users who log in with an email address or with a UPN-style login. For example, if a user logs in as bob@company.com, the script extracts the portion before the @ character from the email address and use bob as the display name in Print Center (shown at the right-hand side of the screen).
-
For MobilePrint email registration, a user record must exist in the Pharos Database. This script creates a basic user record when a matching user does not already exist in the database. Take note that email registration is not supported on versions earlier than Uniprint 9.1.
In Uniprint 9.0 R2 SP5, the script is available as a text file called External Logon - Adjust user details before logging on to PrintCenter.txt. Uniprint 9.1 provides a default script called PPC SSOAdjustUserInfoBeforeLogon available in the System > Scripts context of Pharos Administrator. The new default script includes support for MobilePrint email registration.
If upgrading from Uniprint 9.0 R2 SP5 (with SSO enabled) to 9.1, you will need to update the External Logon plugin point of your Print Center Bank to use the new default script. Also, you must modify the script for the email registration feature to work. See instructions within the script for more information.
To apply the External Logon script, follow these steps:
- Download the script External Logon - Adjust user details before logging on to PrintCenter.txt from the Pharos Community.
- Modify the script as desired. See instructions within the script for more information.
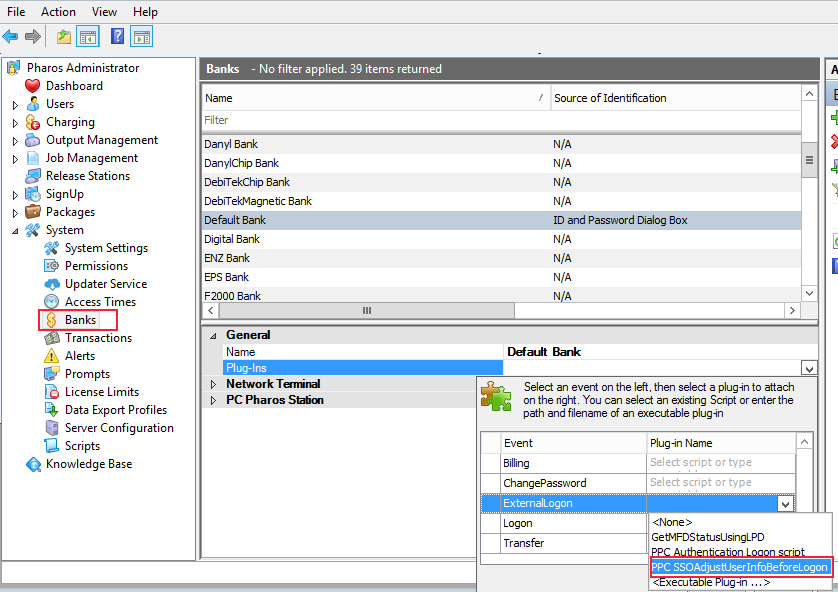
- Add the script to the Bank associated with your Print Center. To do this, navigate to the System > Banks context, select the appropriate Bank and then attach the script to the External Logon plugin-point.
To check the Bank associated with your Print Center, go to the System Settings > Print Center Authentication uses Bank property.
-
Issue a Change Control for changes to take effect.
-
Ensure that users with admin roles are in the Pharos Database.
To apply the External Logon script, follow these steps:
-
Navigate to System > Scripts context in Pharos Administrator. Modify the script PPC SSOAdjustUserInfoBeforeLogon if desired. See instructions within the script for more information.
-
Add the script to the Bank associated with your Print Center. To do this, navigate to the System > Banks context, select the appropriate Bank and then attach the script to the External Logon plugin-point.
To check the Bank associated with your Print Center, go to the System Settings > Print Center Authentication uses Bank property.
-
Issue a Change Control for changes to take effect.
-
Ensure that users with admin roles are in the Pharos Database.
Step 5 - Test your SSO connection
Test that you have set up SSO correctly and make sure that your users can successfully log in to Print Center through SSO.
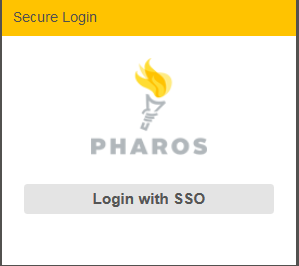
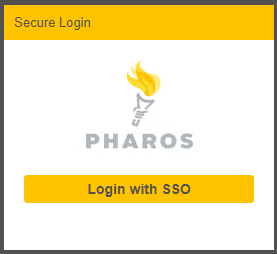
-
Browse to the Print Center website, and click the Login with SSO button.
-
CAS – You will be redirected to the CAS logon page.
-
Shibboleth – You will be redirected to the Shibboleth logon page.
-
Enter user credentials as designated in your directory system (e.g. Active Directory).
-
Once successfully authenticated via SSO, you will be redirected back to the Print Center and logged on with your account.
Step 6 – (Optional) Enable SSO Logout Feature
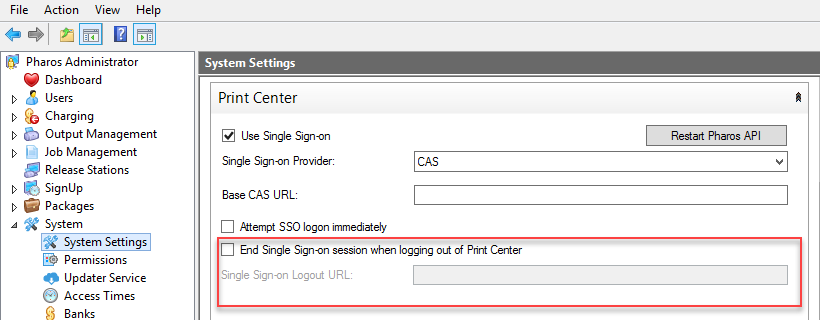
By default, the Print Center logout button logs the user out of Print Center, but the user’s SSO session remains active. If desired, you can enable the Single Sign-on logout feature. When enabled, when a user logs out of the Print Center, the browser will be redirected to the SSO Logout URL (that you provided) to end the SSO session. The user will need to log in again to access the Print Center or any SSO application.
Sample SSO logout URLs:
-
https://cas-server/logout
-
https://shibboleth-server/idp/profile/logout
If your SSO logout page supports an additional redirect parameter, and you would like to redirect the user back to the My Print Center page, you can supply the string "{URL}" and it will be replaced with the current My Print Center URL when logging out.
For example, a CAS server can be configured to redirect the browser to the "service" parameter after logging out. Therefore you could set the logout URL to:
https://your-cas-server/logout?service={URL}
To enable the SSO Logout feature:
-
In the Pharos Administrator, navigate to System > System Settings context.
-
Expand the Print Center tab.
-
Select the End Single Sign-on session when logging out of Print Center checkbox.
-
In the Single Sign-on Logout URL field, you will need to enter the URL used by your Single Sign-on system to end a user’ session.
-
Click on the Restart Pharos API button for the configuration changes to take effect.
Turning off SSO
To turn off SSO, uncheck the Use Single Sign-on option and then click the Restart Pharos API button.
Customizing the SSO Login Page
The button label in the SSO login page that users see when they login can be customized if desired. Using a role with administrator privileges, you can customize the button label in the Print Center (Theme > Text tab). Search for the Single Sign-on Logon Button Text property and then replace the default text.
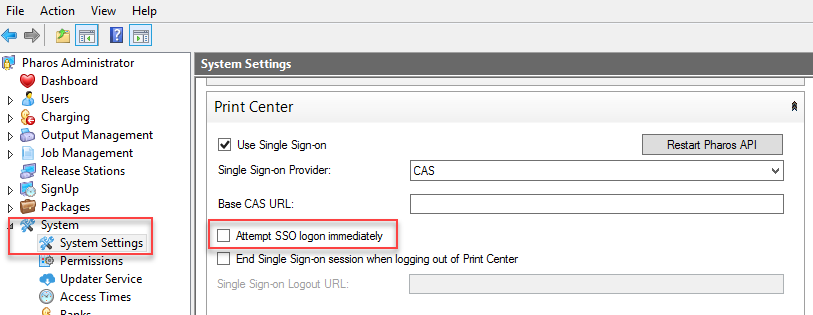
Attempt SSO Logon Immediately
From Uniprint 9.1, you can automatically redirect users to the SSO authentication site if they are not already authenticated. For older versions, users had to click the Print Center logon page first before being redirected to the SSO authentication site.
Use the Attempt SSO logon immediately setting in the System > System Settings context of Pharos Administrator to automatically redirect users to the SSO authentication site.
Allowing SHA1 signatures
Allowing SHA1 signature applies to Print Center version 4.4.8 or higher only.
While we recommend a more secure signature algorithm, you can set the Print Center to allow SHA1 signature, if required. We are only offering this option if you are tied to using the SHA1 setting by other clients that don't support higher signatures (e.g. SHA256), otherwise use a more secure signature algorithm if you can.
To allow SHA1 signatures, you’ll need to add a setting to the Pharos database by running the following SQL query
exec print_center_settings_set 'Authentication', 'idp-allow-sha1', 'yes'
Guest Logon for SSO
This feature is available with Uniprint 9.1 SP3 and requires Pharos Administrator 9.1.9700.604 or later and Print Center 4.11.7.
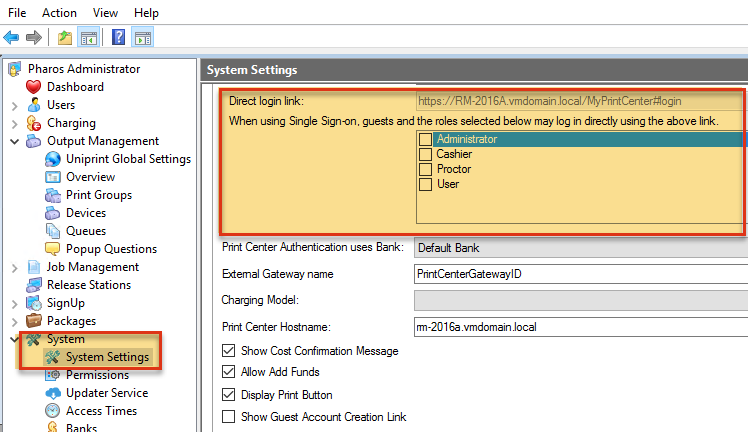
Any user who wants to temporarily use the Pharos Print Center can create a guest account if they have an email address. With SSO, guest users must log on using a separate direct link URL https://servername/myprintcenter#login instead of the standard URL https://servername/myprintcenter/.Settings related to guest accounts are configured in the System > Settings context of the Pharos Administrator.
To allow guest logons with SSO:
1. In the System > System Settings context of Pharos Administrator, select the Show Guest Account Creation Link setting.
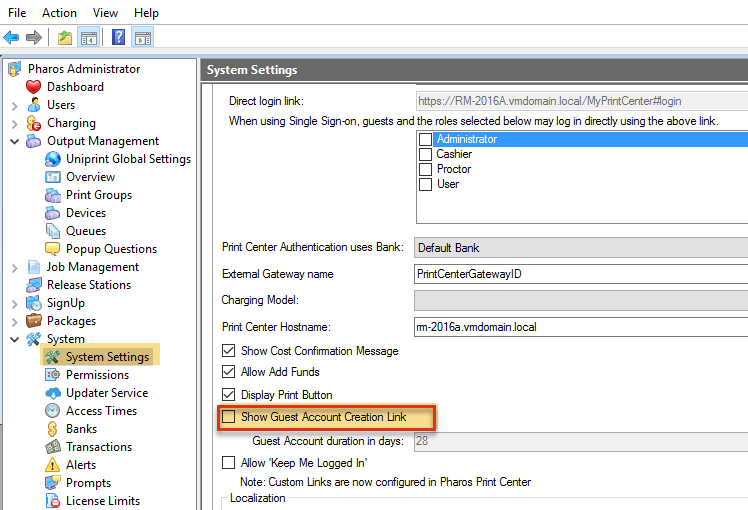
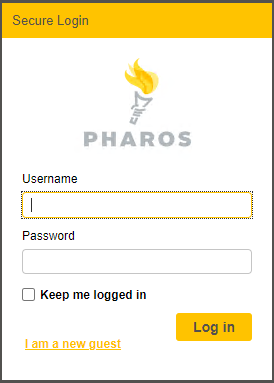
When selected, the I am a new guest link is displayed on the Print Center’s direct login page (the SSO login page does not display this link). Clicking this link opens the Guest Users > New User dialog box allowing users to create new guest accounts.
2. Copy the Direct Login link in the System > System Settings context in Pharos Administrator. Distribute this link to your guest users. The link is in the format https://servername/myprintcenter#login.
3. Optional: Other user roles can also be given permission to use the direct link instead of logging on via SSO.
If your Print Center Bank authenticates against the Pharos database, blank passwords are a security risk. It is highly recommended to add passwords for all user accounts.
4. Issue Change Control for changes to take effect.
SSO users can log in using the standard URL https://servername/myprintcenter/.
Existing guest users or other roles (with permission to use the direct link) can login using direct login URL https://servername/myprintcenter#login. Temporary users can also create new guest accounts by clicking the I am a new guest link.
SSO Settings in Pharos Administrator
You can find SSO configuration settings from Pharos Administrator (System > System Settings context).
Troubleshooting
|
Error |
Resolution |
|---|---|
|
The system could not retrieve any funds for your Logon ID (LogonIDvalue) from the Database. See the System Administrator. |
This error occurs when the system does not have a billing/charging system configured. You can configure your system to charge users through Pharos Database (using internal user purses) or via a third-party billing system. |