Importing Cost Centers and Grants
![]() You can import both Cost Center and Grant information into the Pharos
Database in bulk by setting up and running an Import Profile. An Import
Profile is a reusable template for copying both Cost Center and Grant data to the Pharos
Database from an external file.
You can import both Cost Center and Grant information into the Pharos
Database in bulk by setting up and running an Import Profile. An Import
Profile is a reusable template for copying both Cost Center and Grant data to the Pharos
Database from an external file.
Import Profiles are specific to one Charging Model, and import data on Cost Centers' place in the Charging Model (i.e. category), as well as information on constraints.
Import Profiles are available under Charging > Third Party Charging in the Context Tree.
The procedure for importing Cost Centers and Grants are the same. However, it is important to note that when importing Grants, you have to configure Grant related fields.
To import Cost Center or Grants:
- Adding an Import Profile
- Configuring the Import Profile to match the data source
- Running the Import Profile
Adding Import Profiles
The first step in importing Cost Centers or Grants is to create an Import Profile containing the information about where and how to retrieve the Cost Center or Grant information.
To add a new Import Profile:
- In the Import
Profiles Actions pane, select the
Insert action (
 ). This opens the Insert Import Profile
dialog, which collects the necessary information and creates a new Import
Profile entry with it.
). This opens the Insert Import Profile
dialog, which collects the necessary information and creates a new Import
Profile entry with it. - In the Insert Import Profile dialog box, configure the following properties:
|
General Category |
Do this |
|---|---|
|
Name |
Enter a name for the Import Profile. |
|
Charging Model |
Select the Charging Model that the new Import Profile will import data into. |
|
Incremental |
Select "Yes" to set the profile to perform an incremental import. Selecting "No" will set the profile to perform a full import. |
|
Overwrite Rates |
Select "Yes" if you want to apply a new Discount Rate schedule to pre-existing Cost Centers when this Profile is run. Selecting "No" will preserve the Discount Rate Schedules of existing Cost Centers. |
|
Filename |
Enter the fully qualified path name of the file from which the data on Cost Centers is to be loaded, or click the ellipsis to browse to the file. |
|
EOL Characters |
Select the end-of-line character that the data file uses. |
|
File Format |
Select the data file format that the data file uses. |
|
Field Delimiter |
If you selected "Delimited columns" previously, enter the column delimiter character . |
|
Text Qualifier |
If you selected "Delimited columns" previously, enter the string delimiter character. |
In the Units category, include the type of information you want the Profile to import.
|
Units Category |
Do this |
|---|---|
|
Include Cost Centers |
Select "Yes" to Include Cost Centers. Selecting "No" does not include the Cost Centers information in the import. |
|
Include Cost Center Constraints |
Select "Yes" to Include Cost Center Constraints. Selecting "No" does not include the Cost Center Constraints information in the import. |
|
Include Group Constraints |
Select "Yes" to Include Group Constraints. Selecting "No" does not include the Group Constraints information in the import. |
|
Include User Constraints |
Select "Yes" to Include User Constraints. Selecting "No" does not include the User Constraints information in the import. |
- Click OK. The new Import Profile entry is inserted into the Pharos Database. The next step is to configure the import profile to match the data source.
Configuring the Import Profile to match the data source
The Import Profile must now be configured to be able to retrieve the data source.
- In the Properties Window, expand Units > Cost Center > Import Source Settings and then click the end of the Fields property. This opens a selection box with a range of fields to choose from as shown in the following figure.
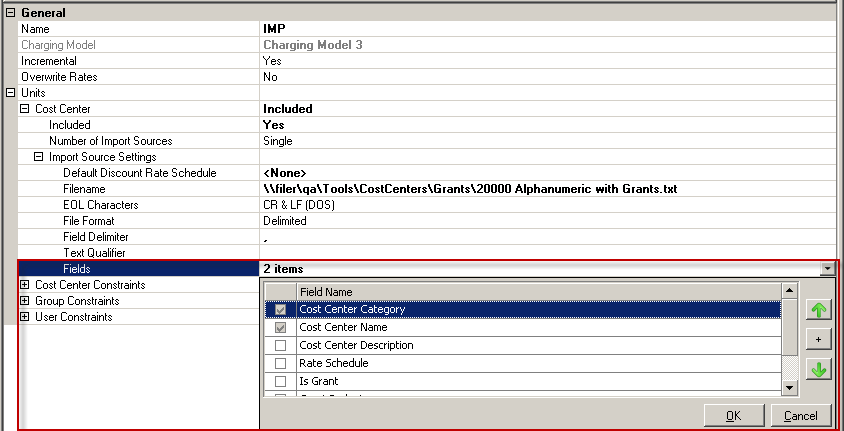
- Select the fields for the Cost Centers or Grants that are imported in this Import Profile, and any required fields of where and how they appear in the source. By default, Cost Center Category and Cost Center Name are selected.
- When selecting fields for the Import Profile make sure that the selected fields match the fields on the source data including the order of how the fields appear. Use the green arrow button to move a field up or down the list.
- For Grants: When importing data with Grants, make sure that you select the following Grant related fields:
- Is Grant
- Grant Budget
- Enforce Budget Limit property is optional.
- In addition, you have to ensure that the source data contain "Yes" for the column "Is Grant".
- If you want to add a combination of Cost Centers and Grants, you have to make sure that the source data contains "Yes" for Grants and "No" for Cost Centers.
- If the source data does not include a column for "Is Grant" then the importer will treat all the data as standard Cost Centers.
Running Import Profiles
Once a profile has been created and configured, it can be used to run an import at any time. It is also possible to perform a test run of the profile, where the imported data is not actually added to the Pharos Database, it is simply displayed for confirmation and then discarded.
There are two ways to run the Import Profiles. You can choose from any of the following methods:
- Run from the Pharos Administrator
- Run from a command line
Only Cost Centers and/or Grants are created in an import - a Charging Model with Cost Center Categories (whose names must be as specified in the data source) must already exist before the import is run.
Running Import Profile from the Pharos Administrator
To run (or test) an import from Pharos Administrator:
- Select the appropriate Import Profile and click the Run Profile button on the Import Profiles Action Pane. A dialog asks whether or not this is a test import:
- Click Yes to perform a test run. The data is extracted from the data source, and the results of the import are displayed, but the data is not inserted into the Pharos Database.
- Click No to perform a normal import. The imported data is added to the Pharos Database, and Cost Center and/or Grant entries appear in Pharos Administrator.
In either case, a window displays the results of the import and any errors or messages generated during the import process.
Running Import Profile from the Command Line
To run (or test) an import from the command line:
Open a command prompt at the Pharos\bin directory and enter:
ccimport <import_profile> <dumpfile>
where:
<import_profile> is the name of the Import Profile that you want to run.
<dumpfile> is an optional parameter - if you are running a test, this parameter specifies the name and path of a file for the imported data to be written to instead of the Pharos Database. In a normal import, this parameter should be omitted.
Deleting User Constraints
The ccimport tool can be used to delete a supplied set of user-constraints while leaving other existing user constraints in place.
To delete user constraints, open a command prompt at the Pharos\bin directory and enter:
ccimport -delete <sourcefile>
where <sourcefile> is the name of the file containing the user constraints to be deleted, in the following fixed format:
- User, Category, Cost Center
- Ensure no spaces are included after the comma separators
- Include the path of the constraints file if not in the Pharos\bin folder
Results can be output to a file instead of the command line by appending >output.txt to the end of the command for example:
ccimport -delete <sourcefile> > output.txt