Uniprint Technote: Updating Uniprint 9.1 Servers with no Internet Connection
Overview
The Updater Service allows administrators to easily update their Uniprint system with the latest hotfixes, service packs, or Pharos server updates. The Updater Service requires an internet connection to download updates from the Pharos cloud (hosted within Amazon Web Services). If your Pharos servers are not connected to the internet, you can update your system by manually downloading the Updater Service and the update packages from the Pharos Community website.
Before you begin
- Be sure to read the “Impact of this Update” topic in the Uniprint 9.1 Service Pack Release Notes document. It summarizes the potential impacts this Service Pack may have.
- Back up your database. For information about backups, please refer to the Backing up for Uniprint Service Packs document.
- Because this Service Pack updates the Database schema and the Database Service, consider this Service Pack as if it were a major upgrade. We recommend installing the Service Pack during off-peak hours to minimize disruption of printing services.
- Disable connection to Internet source feeds. The following section explains in detail how to disable connection to Internet source feeds.
Disable/Enable connection to Internet source feeds
The Uniprint Updater Service is designed to be used on servers and workstations with, or without Internet access. If Internet access is available, then updated components can be downloaded automatically from the Pharos Updater Server, hosted in AWS (Amazon Web Services).
If Internet access is not available on the computers with Updater Services, there is a manual process to download the updated components from the Pharos Community and place them on the servers. Once these files are on the servers, the Updater Service can perform the update function, using the downloaded components. Normally this process is quick, but in some cases, the servers erroneously ‘sense’ they can connect to the Internet, when they really can’t. This can result in the Update process taking a very long time, as the system must time out of each operation, attempting to connect to the Internet, before moving on to use the local resources.
You can disable the attempt to use the Internet and force the system to use locally provided files only (resulting in a quicker update process) in the System > Updater Service context of Pharos Administrator.
To disable connection to Internet source feeds on every machine running the Updater Service:
- Navigate to System > Updater Service in Pharos Administrator.
- Click the Edit Configuration button in the Actions pane.
- In the Configuration tab:
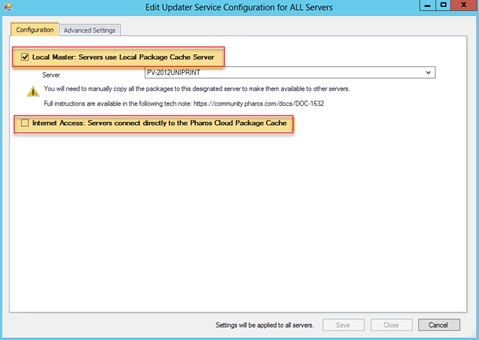
- Make sure that Local Master: Servers use Local Package Cache Server is checked on.
The server that you select here will be your master server from which all other servers will get their packages from when updates are available locally.
- Untick/clear the option Internet Access: Servers connect directly to the Pharos Cloud Package Cache.
- In the Advanced Settings tab, check the Servers to apply Configuration Settings. Take note that all the checked servers will have the settings applied.
- Click Save. You’ll get the message “This will apply changes made in any of the Edit Updater Configuration tabs to ALL servers. Do you want to continue?
- Click OK.
To re-enable connection to Internet source feeds on every machine running the Updater Service that does not have Internet access.
- Navigate to System > Updater Service in Pharos Administrator.
- Click the Edit Configuration button in the Actions pane.
- Select the Internet Access: Servers connect directly to the Pharos Cloud Package Cache.
- Click Save.
Applying the Service Pack
Download and Install the Service Pack
Depending on how this Service Pack or its files were copied to the target machine, some of the files may have been 'blocked' by Windows. Trying to update with a blocked file will most likely prevent that component from working correctly. To check whether a file is blocked and/or unblock it, right-click the file in Windows Explorer and select 'Properties'.
- From this page in the Pharos Community, download the Service Pack zip file.
- On your Principal Server, unzip the 91SPX-Packages.zip file (e.g. 9.1SP3-Packages.zip).
- Copy the contents of the unzipped folder to \ProgramData\PharosSystems\UpdaterService\cache-v2.0. The Updater Service will unpack the .nupkg files and create new folders for those packages. You may allow a few minutes for this process to complete.
- Log in to Pharos Administrator and navigate to the Updater Service context or click Refresh if you have it already open.
- In the Updater Service (Host) dropdown box, select ALL to view the Service Pack 3 package.
Selecting a specific server will install the Service Pack for the selected server only. However, you must first install the Service Pack on the Principal Server (where the Database Service is installed) before other servers can have the Service Pack installed.
- Click the Download button next to the Service Pack 3 package to open the Service Pack installation management wizard.
- Follow the on-screen instructions in the wizard.
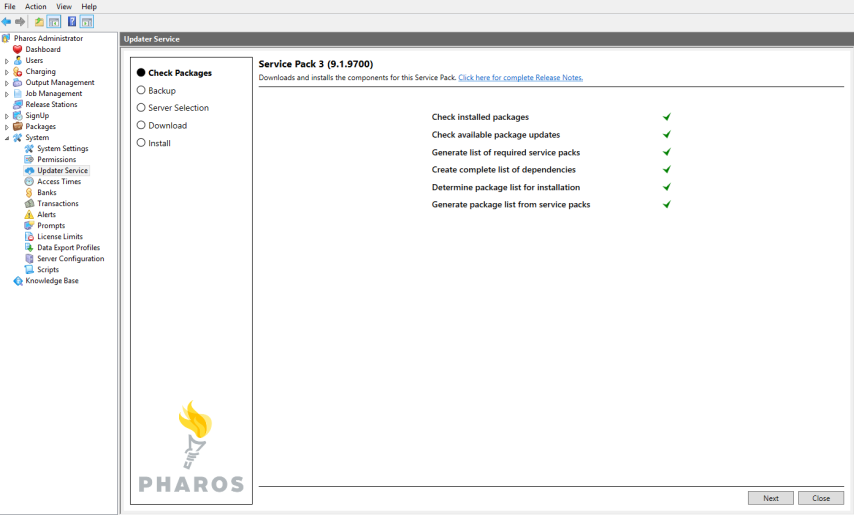
7.1. Check Packages. The wizard performs a preliminary check to verify that the Service Pack can be applied. It checks previously installed packages, compares the packages against the repository, and determines the packages for installation.
7.2. Backup. Backup Pharos Database and snapshot server instances. It’s important to back up your Pharos Database and ensure that the backup is usable. If the update fails, you may need to restore the Pharos Database from this backup.

Use the checkbox to verify that a backup has been completed.
7.3. Server Selection. Select the server(s) on which to install the Service Pack. The Principal Server (i.e. server with the Uniprint Database) will be automatically selected because the Database Schema and the Database Service must be updated as the first step in installing the Service Pack.
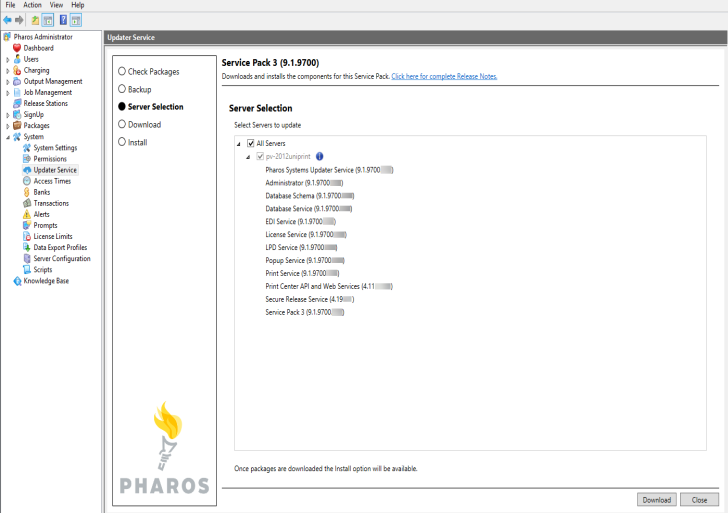
Check the boxes next to server names to install updates on those servers and then click Download.
7.4. Download. Depending on the components installed on each server, the relevant components will be downloaded to the server(s) selected. Use the Selection button to get back to the Server Selection page and select other server(s) to run download or install on.
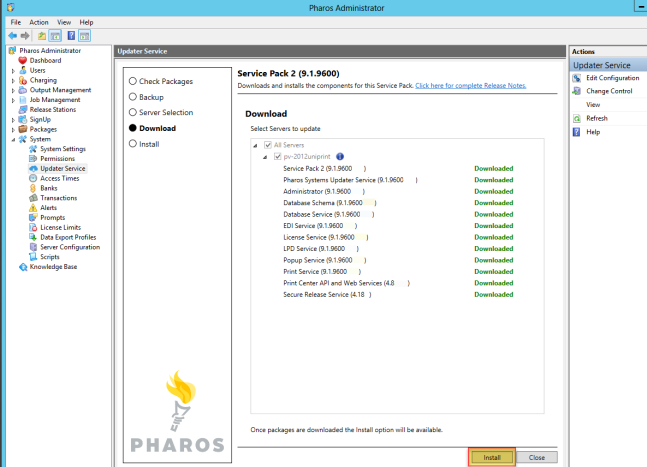
7.5. Click Install to install Service Pack on the selected server(s). The wizard will attempt to install the Service Pack on all the selected servers.
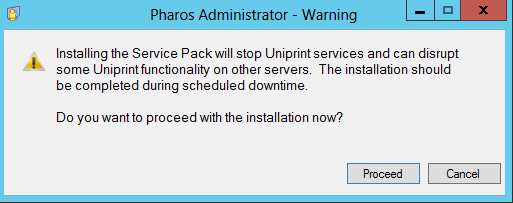
- Click Proceed to install Service Pack . We recommend installing the Service Pack during off-peak hours because the installation process will stop Uniprint Services and can disrupt some Uniprint functionality.
- Install. The Install screen shows the components installed on the selected servers.
- Refer to the Service Pack 3 Release Notes document for tasks that you need to complete after applying Service Pack .
- The following dialog box opens. Click OK to apply changes to Administrator.
12. Verify that the Service Pack and its components are installed on your servers by checking the Installed Packages section of the Updater Service context. The following components should have been updated to 9.1.9700.xxx.
- Database Schema
- Database Service
- Print Service
- EDI Service
- LPD Service
- License Service
- Pharos Systems Updater Service
- Administrator
- Popup Service
The following components are also updated:
- Print Center API and Web Services
- Secure Release Service