Making Reservations with the Nerve Center
Staff members can use the Nerve Center to create reservations for users, either individually or in blocks.
Reservations for individual users are made from the Reservations tab. Select Queued/Scheduled Reservations and enter the logon ID of the user you want to make a reservation for. The screen that appears differs depending on whether Queued or Scheduled reservations are available for the currently selected group. If both types of reservation are available, two Reservation Type options appear. Depending on which option is selected, the screen displays different fields.
Any user limits or quotas that may apply are ignored when making a reservation via the Nerve Center.
Queued Reservations
Staff members can insert a user into any place in a queue. Enter the requested details and click Reserve a Computer to insert the selected user into the queue for the currently selected Computer Group. Users can be inserted into one of three positions in the queue:
- At the front of the queue - the user is moved to the head of the queue, and will be assigned the next available computer
- At the end of the queue - the user is placed at the end of the queue, as though they had made the reservation themselves
- At a maximum waiting time of no more than: - SignUp calculates where the user must be placed in the queue to ensure that they wait no longer than the specified amount of time

Scheduled Reservations
Enter the requested details and click Reserve a Computer to schedule a reservation for the selected user. A small calendar is available to select the day of the reservation. Days which are unavailable are crossed out. The current week is highlighted in green, and the currently selected day is highlighted with a box.

Every time a detail is changed, the Nerve Center resubmits all information and refreshes the page. This can be necessary when some options, e.g. available start times, cannot be determined until the user's Logon ID is known. This also allows any problems with the details entered to be highlighted immediately.
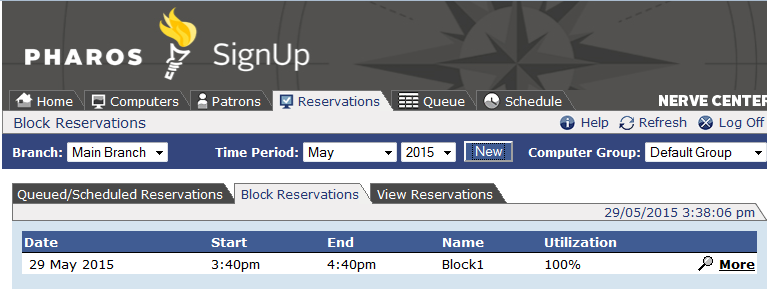
Block Reservations
Staff members can use the Nerve Center to create blocks of Scheduled reservations for a class or other group activity. Block reservations apply to a single Computer Group, and can involve some or all of the computers in that group.
To make a block reservation:
- Select Block
Reservations on the Reservations tab (
 ), make sure
the appropriate Computer Group is selected from the combo box at the top
of the screen, and click New.
), make sure
the appropriate Computer Group is selected from the combo box at the top
of the screen, and click New.
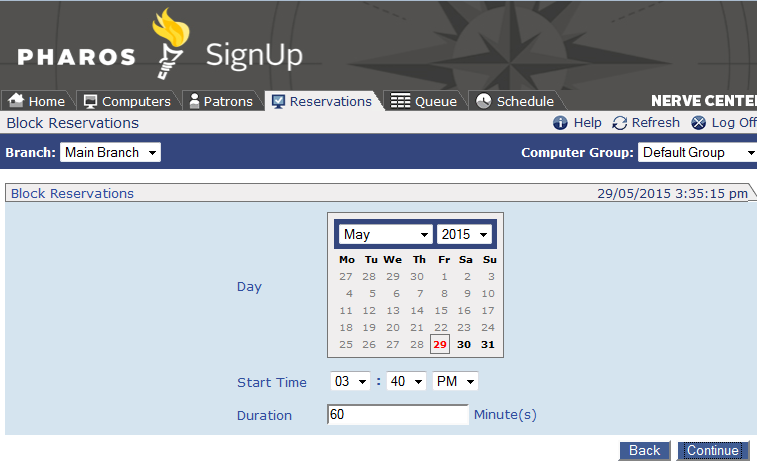
 View screen
 - Select a day, start time and duration for the
block reservation, then click Continue.
View screen
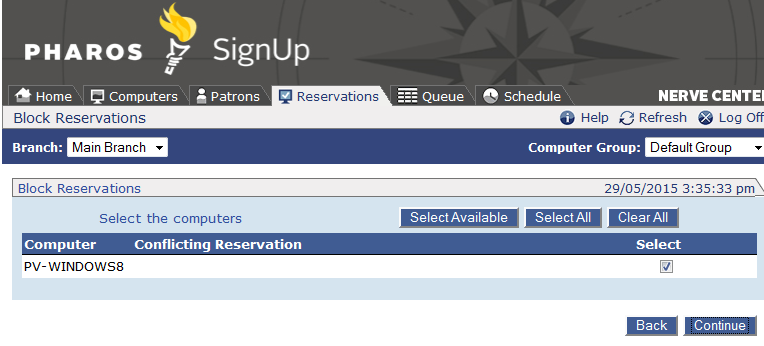
- All computers in the currently selected Computer Group are listed.
Tick the boxes for all computers that will be reserved in the block, then
click Continue. View
screen
Any computers that have conflicting reservations are highlighted. Click the More link next to a computer to view details of the reservation(s) on that computer. Any conflicting reservations will be canceled when the block reservation is made. The affected users must be informed that their reservations have been canceled.
The Canceled Scheduled Reservations report can be used to generate a list of users who must be informed that their reservations have been canceled.
Any sessions already in progress when the block reservation is made are not affected. For example, if a user starts a one hour session on PC1 at 12:45, and a block reservation including PC1 is placed at 12:50, starting at 1:00, PC1 will not be included in the block reservation.
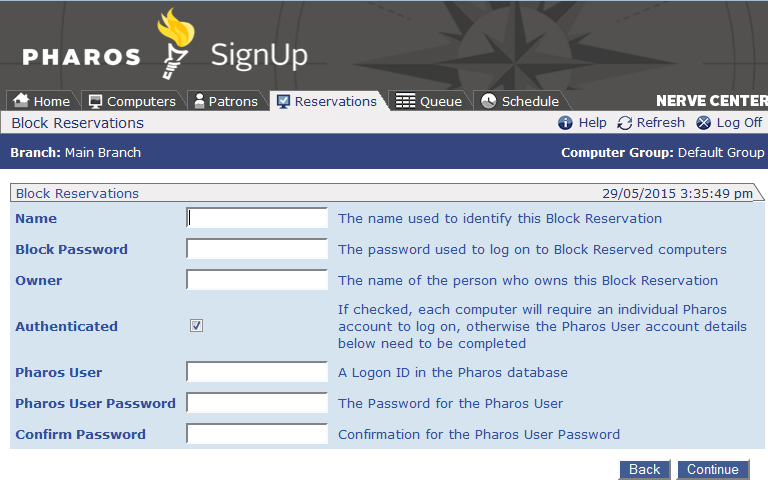
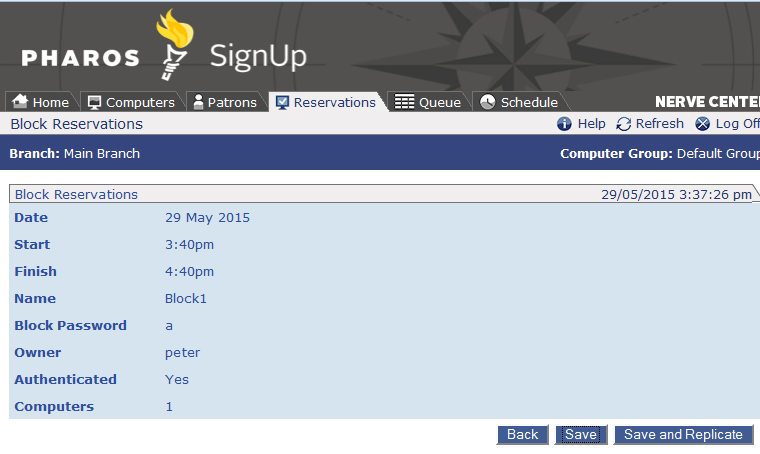
- Enter administrative details for the block reservation and click
Continue. View screen
The following details must be entered:
- Name - a name to uniquely identify the block reservation.
- Block Password - an optional password that users are given to access block-reserved computers. This is in addition to logging on.
- Owner - the name of the person responsible for the reservation. This does not have to be a Pharos User account.
- Authenticated - tick this box if users will be logging on to computers with their own logon details. If users do not have logons, clear this box, and supply values for the two properties below.
- Guest User - if the block reservation is not authenticated, this field must contain the Logon ID of the Pharos User account that all users will be logged on to the SignUp Client with. All sessions in the block will be recorded against this account, and all sessions will use the account's Environment.
- Guest Password - if the block reservation is not authenticated, this field must contain the password associated with the Logon ID entered above.
- The details of the new block reservation are displayed.
Click Save to make the reservation,
Save and Replicate to repeat
the block reservation, or Back
to change any details before saving. View screen
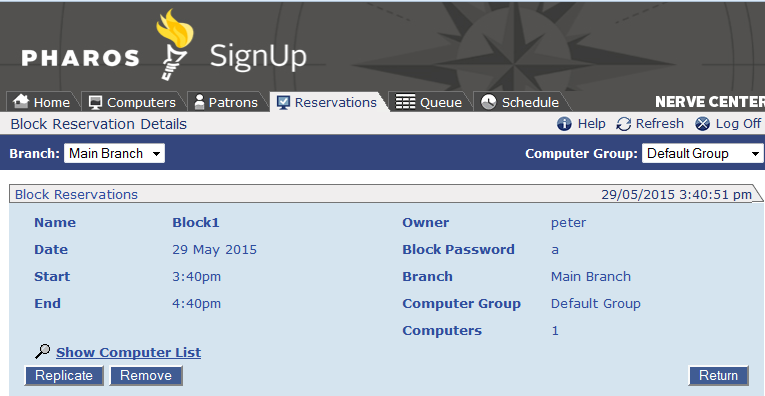
Replicating Block Reservations
Once a block reservation has been created, it can be set to repeat at a regular interval. This can be useful if the activity that the computers have been block-reserved for is a regularly recurring event.
To set a block reservation to repeat, either click the Save and Replicate button when the reservation is first created, or select the reservation's More link on the main Block Reservations screen and click the Replicate button. This brings up the following screen:
Select options for how the block reservation should repeat:
- Repeat - select whether the reservation should repeat daily, weekly or monthly. Enter how many days/weeks/months should be between each repeat of the reservation. If the reservation is repeating monthly, select whether it should occur on the same date each month, or on the first/second/third/fourth/last day of the month.
- Starting on - select the date that the first of the repeating reservations will occur on.
- Count - enter the number of times the block reservation should be repeated.
Click Create to create the specified
number of block reservations. These repeating reservations are displayed
with the ![]() icon on the main Block
Reservations screen.
icon on the main Block
Reservations screen.