Customizing Pharos Stations: Legacy Mode
This document covers how to customize Pharos Stations in Legacy mode. If you are running Pharos Stations in Print Center mode, please refer to the Customizing Pharos Stations: Print Center Mode topic.
The overall appearance of a PC Pharos Station can be customized by selecting (and optionally modifying) a color scheme for it. A color scheme can be selected when the Pharos Station is installed from the command line - the following schemes are available:
- "Pharos Vx3" - the default Pharos scheme (matches the SignUp Vx3 interfaces)
- "Blue Sky" - a color scheme in shades of blue
- "Brain Food" - a library-themed color scheme in shades of orange
- "Building Blocks" - a color scheme in shades of yellow
- "Expedition" - a color scheme in shades of brown
- "Explore!" - a children's scheme in shades of green
- "Hit the Books" - an education-themed scheme in shades of gray and brown
- "Mist" - a color scheme in shades of gray and light blue
- "Print Control" - a corporate-themed scheme in shades of blue
Using the Pharos Station Color Utility
Brand new color schemes can be created for the Pharos Station after installation by using the Pharos Station Color Utility. This tool also allows the user to modify existing ones. Open the Pharos Station Color Utility from the Start menu at Programs > Pharos.
Controls
Properties that can be Configured
Configuring Multiple Pharos Stations
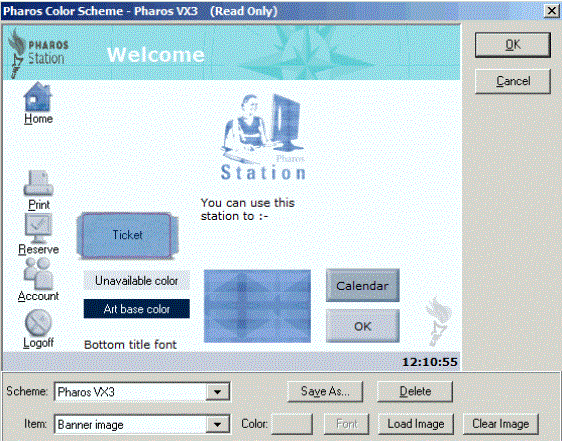
Click
on any part of the image below for information on the control or display
property.
Controls
The following buttons and controls can be used to customize the Pharos Station color scheme:
|
Property |
Description |
|---|---|
|
Main Image
|
A reduced image of the Pharos Station display takes up most of the display. Click on any part of the main image to configure the properties of that part of the Pharos Station display. Depending on what type of property is being configured, the Color, Font or Load Image button will become active. |
|
Scheme
|
Select an existing color scheme to apply to the Pharos Station from this combo box. Several schemes are installed with the Pharos Station, and new schemes can be created by modifying existing ones and saving them as a new scheme. If the currently selected scheme has been altered and a new scheme is selected, changes to the first scheme will be lost unless they are saved. |
|
Item
|
Select the item to configure from this combo box. Once selected, use the Color, Font or Load Image buttons to configure the item. |
|
Color
|
This button is active if a Color property is chosen. Clicking this button opens the standard Windows Color dialog, presenting a number of pre-defined colors. Choose a color from this selection, or click Define Custom Colors to choose a specific color from the full palette (determined by how many colors your display is currently configured to show). |
|
Font |
This button is active if a Font property is chosen. Clicking this button opens a dialog where the font face can be chosen. |
|
Load Image
|
This button is active if an Image property is chosen.
Click this button to browse for the desired image. A preview of the selected
image is displayed, along with the image dimensions. Click the preview
button ( |
|
Clear Image |
This button is active if an Image property is chosen. Click this button to remove the chosen image from the Pharos Station. |
|
Save as... |
Saves the current configuration as a new color scheme. |
|
Delete |
Deletes the currently selected scheme. |
|
OK |
Closes the dialog, saving any changes to the selected scheme and applying that scheme to the Pharos Station. The default color schemes installed with the Pharos Station cannot be changed - if you have made changes to a default scheme, you must save it as a new scheme with the Save as... button. |
|
Cancel
|
Closes the dialog without applying any changes to the Pharos Station. Any unsaved changes made to individual color schemes will be lost. |
Properties that can be Configured
The following properties of the Pharos Station can be configured. Select a property from the Item combo box or by clicking on the relevant part of the main image, and then use the Color, Font or Load Image buttons to configure it.
Color Properties
Property | Description |
The color of the main window background. | |
The color of any 3D controls (buttons etc). | |
The color of the frame - the section the runs along the top and left-hand side of the Pharos Station, containing the buttons for the available contexts. | |
Title Font Color | The color of the font used against the Banner Image. |
The color of the clock displayed in the bottom right of the Pharos Station. | |
The color of the font used against the Status Bar Image. | |
Body Text Font Color | The color of the font used in the main window. |
3D Objects Font Color | The color of the fonts used on the 3D controls (buttons etc). |
Calendar Font Color | The color used for text on the calendar control on a Reservation Station. |
On a Reservation Station, the color used to signify unavailable times on the reservation timebar. | |
Menu Font Color | The Color used for the text underneath menu icons. |
The color used for the calendar control on a Reservation Station. | |
The color used for text on the Home screen. | |
Ticket Color | The color of the buttons that appear on the Ticket image on the confirmation screen of the reservation wizard. |
Ticket Font Color | The color used for text over the Ticket image on the confirmation screen of the reservation wizard. |
Font Properties
Window Font
The name of the typeface used for all text on the Pharos Station. Make sure that the font chosen is installed on all Pharos Station machines.
Image Properties
By default, images are stored in directories named after each color scheme, located in Program Files\Pharos\Bin\Images.
Custom images can be provided for the Pharos Station. Images should be supplied in one of the following formats using a palette appropriate to the display options of the Pharos Station on which it is used:
- Bitmap (*.bmp)
- JPEG (*.jpg, *.jpeg)
- Windows Meta File (*.wmf)
- Windows Enhanced Meta File (*.emf)
- Windows Icon (*.ico)
The following table gives the suggested sizes for each image at different monitor resolutions. Images are stretched or shrunk to fit the Pharos Station display if they are not the suggested size.
Image | Suggested size at | Suggested size at | Suggested size at |
|---|---|---|---|
Banner Image | 549 × 53 | 683 × 64 | 874 × 83 |
Site Image | 400 × 160 | 500 × 200 | 640 × 256 |
Status Bar Image | 640 × 27 | 800 × 33 | 1024 × 42 |
Branding Image | 94 × 52 | 118 × 65 | 150 × 83 |
The Texture Image is tiled behind the graphics on the Pharos Station Home screen, and may be any size.
Property | Description |
|---|---|
This is the image displayed at the top of the Pharos Station screen. The title of the Pharos Station screen (e.g. "Welcome", "Identifying Yourself") is displayed on top of this image. The image may contain transparency - where there is transparency, the Frame color shows through from underneath. | |
| This is the main image displayed on the Pharos Station Welcome screen. It is also the image used for the Pharos Station's screen saver. The image may contain transparency - where there is transparency, the Window color shows through from underneath. |
The texture image is tiled behind the images on the Pharos Station Home screen. If no texture image is specified, a blue default texture will be used. | |
This image is displayed at the bottom of the screen. Status information is displayed over this image. The image may contain transparency - where there is transparency, the Window color shows through from underneath. | |
This image is optional. It is displayed at the bottom left of the screen, and allows a site/distributor to brand the Pharos Station. Part of the image may be transparent. The image may contain transparency - where there is transparency, the Frame color shows through from underneath. | |
This image is displayed behind the reservation details on the confirmation screen of the reservation wizard. Ticket images in a variety of colors are installed with the Pharos Station, and are available in the Pharos\bin\images\tickets directory. |
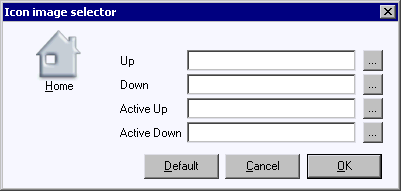
Icons
The images used for the menu icons on the left hand side of the Pharos Station can be changed by clicking on each icon. This opens a small dialog where image files for the icon in each of its states can be selected. The icon on the dialog can be clicked on to show the different states.
Configuring Multiple Pharos Stations
The Pharos Station Color Utility must be run separately on every machine. On a site with many Pharos Stations, this can make changing the appearance of all Pharos Stations a time-consuming process, especially if an entirely new scheme is being created for the Pharos Stations. Certain steps can be taken to save time when configuring the schemes of multiple Pharos Stations.
When creating the new scheme on one Pharos Station, store images in a central location, and give the full path (including computer name) of the image files. This means that the image files will not need to be distributed to all affected Pharos Stations, and any changes made to the images need only be made in one place.
Color scheme settings are saved in the registry. Once a new scheme is created, a copy can be made of this registry information, which can then be distributed to all Pharos Station machines. This means that configuring all Pharos Stations after the initial one is simply a matter of installing this new registry information on the other machines, rather than configuring them all with the Color Utility.
To copy and distribute the color scheme registry information:
- Open the Registry Editor by typing regedit from the command line.
- Go to HKEY_LOCAL_MACHINE\ SOFTWARE\ Pharos\ Station\ Color Scheme.
- Select Export Registry File from the Registry menu.
- Save the Color Scheme key as a .reg file.
- Run this .reg file on other Pharos Station machines by double-clicking on it. This adds the scheme information to the machines' registry.
Other Pharos Station display options are configured in the Pharos Stations context of Pharos Administrator.
If images are not stored centrally, they must be copied to the appropriate location on each machine.
Changing default labels, messages, and texts
You can change the default labels, messages, and texts on the Pharos Station. For example, you can change the label for the Logon ID or the label on the Home button.
- Open a command prompt and run pstation.exe -registry from the Pharos\bin directory.
- Visit the pages (e.g. Login screen, Home button) you want to customize. This will populate new registry keys such as Messages, PrintForm, WelcomeForm, etc. to the location HKLM\Software\Pharos\Station
- Open the registry editor under HKEY_LOCAL_MACHINE\Software\Pharos\Station and update the text, label, messages, etc as desired.
- Update the text, label, or message as desired.
Localizing the Pharos Station buttons, instruction texts, and messages
Pharos Station provides the ability to localize all text, labels and messages to French, Spanish, Italian or German.
Follow these steps to localize the Pharos Station to any of the supported languages.
- Run the appropriate registry file (e.g. PStation_French_32bit.reg) based on the desired language and 32-bit or 64-bit machine platform. The registry files are in the client\pstation folder of the Pharos disk image.
- Apply the selected registry file by double clicking it. This creates registry entries for the user interface controls e.g. buttons, instruction texts, and messages to the location HKLM\Software\Pharos\Station.
- Restart the Pharos Station.
Pharos Station localization has the following limitations:
Localisation only supports Print functionality, it doesn't suppport "Manage Accounts" and "Reservations" functions.
- Registry files are found under client\pstation for both 32 & 64 bit machines. It is a manual process to execute registry file, which depends on the desired language. If you want to rollback to English language, execute English registry file.
Most of the messages have been identified and translated. However, if the System come across with some unknown messages that are not translated, then those messages are placed under 'HKLM\Software\Pharos\station\Messages\Misc' in registry. Users can manually edit Registry and translate them in to their desired language if required. The message in the Misc subkey is in the format "Message in English;". For exampe: if the message is in Misc subkey is "Logon plug-in returned no results;". Then the translated message should be appended after the semicolon. Therefore, subsequent times Pharos Station only picks the message which is translated.
On Windows 7 & Windows Vista, due to Virtualization, Pharos Station writes the unknown messages in the registry at the location HKEY_USERS\{SID}_Classes\VirtualStore\Machine\Software\Pharos\Station\Messages\Misc on 32-bit machine and at the location HKEY_USERS\{SID}_Classes\VirtualStore\Machine\Software\Wow6432Node\Pharos\Station\Messages\Misc on 64-bit machine.
The Print Jobs screen provides a filter to filter the print jobs alphabetically. The fitering tabs are in English. It doesn't support filtering translation.