Using Pharos Station: Legacy mode
The Pharos Station application allows a PC to function as a multipurpose user station. The Pharos Station: Legacy Mode allows users to complete any or all of the following, depending on configuration:
- pay for and release a print job
- make a reservation
- check the status of their account or complete related administration
- create a new account
The Pharos Station may be run with a touch screen (interface size can be configured to be more suitable for touch screens).
The Pharos Station does not support the Large Fonts option in Windows (set at Control Panel > Display). The Font Size property should always be set to "Small Fonts".
Starting the Pharos Station: Legacy Mode
Start the Pharos Station application from the Start menu at Programs > Pharos. Once the Pharos Station starts up, users are presented with the Welcome screen, which lists the services available on that Pharos Station. The appearance of this (and all other) Pharos Station screens can be configured with the Pharos Station Color Utility. If the Welcome screen remains inactive, a Pharos screen saver is displayed.
The time before the screen saver is displayed can be configured through the use of Registry keys.
Logging On
The Welcome screen/screen saver is dismissed by pressing a key or mouse button, moving the mouse, or swiping/inserting a card.
If the Pharos Station is configured to use some form of external payment (e.g. cash cards) and does not identify the user, or if payment is not required for services, swiping/inserting a card will take the user immediately to the Pharos Station menu. In this case it is up to the administrator to configure a Logon Prompt that will provide instructions for users on how to log on.
Where users are not required to have individual logons and no payment is required for services, any mouse movement or key strike calls up the Pharos Station menu.
Only printing services can be offered in a non-authenticated environment. All other services require that the user be known to Pharos.
To operate a Pharos Station in a non-authenticated environment where users are neither identified nor charged, select "Mouse Move or Key Click Bank" as its Bank at Release Stations > [selected Pharos Station] > General category. To set up a non-authenticated environment where users are still charged, configure a Bank to have Source of Identification as "N/A" or "Mouse move or key click", and any external form of Source of Payment (cash cards, online billing services, etc).
Where users are required to identify themselves to the system, dismissing the Welcome screen gives way to the "Identifying Yourself" logon screen:
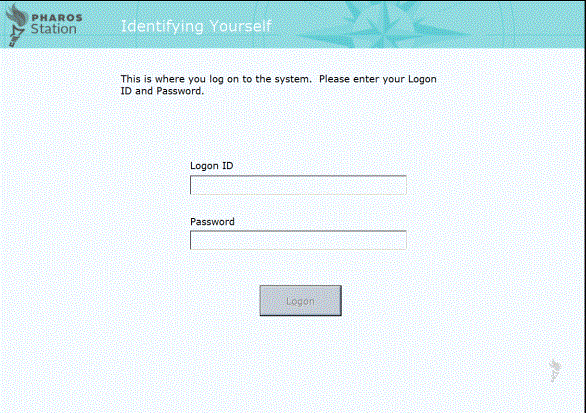
The default Pharos logon screen requests "Logon ID" and "Password". These logon prompts are configurable to use terminology more relevant to the site (e.g. "PIN"). Depending on the Pharos Station's configuration, some or all of the following buttons may be available on the logon screen:
- Log On allows users access to Pharos services via the Pharos Station menu.
- Log Off recalls the Welcome screen. The Log Off button is available on all Pharos Station screens.
- A New User button is present if the administrator has allowed for users to create their own accounts. The ability for users to create their own account is allowed or disallowed at Release Stations > [selected Pharos Station ] > General category.
- New users ignore the logon entry and click New
User, opening a dialog box for new users to enter identification
details so an internal account can be created for them:
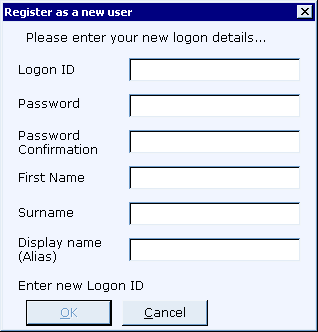
Once the new user account is inserted, the user is immediately logged on to the Pharos Station.
The Pharos Station Menu
After logging on, users are presented with the Pharos Station menu. The default screen is displayed, and buttons on the side of the screen allow access to the other available screens.
Multiple options may be available, depending on how the Station is configured:
- Home recalls the main menu screen where a function can be selected.
- Print calls up the "Releasing Print Jobs" screen.
- Reserve calls up the "Reservations" screen.
- Account calls up the "Account Details" screen.
The services offered by Pharos Station are configured at Release Stations >[selected Pharos Station] > General category.
Which screen is displayed immediately after logon depends on the Default Type option selected at Release Stations > [selected Pharos Station > General category.
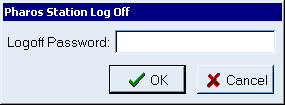
Closing the Pharos Station
Close the Pharos Station application by pressing CTRL+SHIFT+Q and entering the logoff password. The logoff password is configured for the Station at Release Stations > [selected Pharos Station] > General category. This password should not be given to users. Enter the logoff password and click OK to exit the program.